
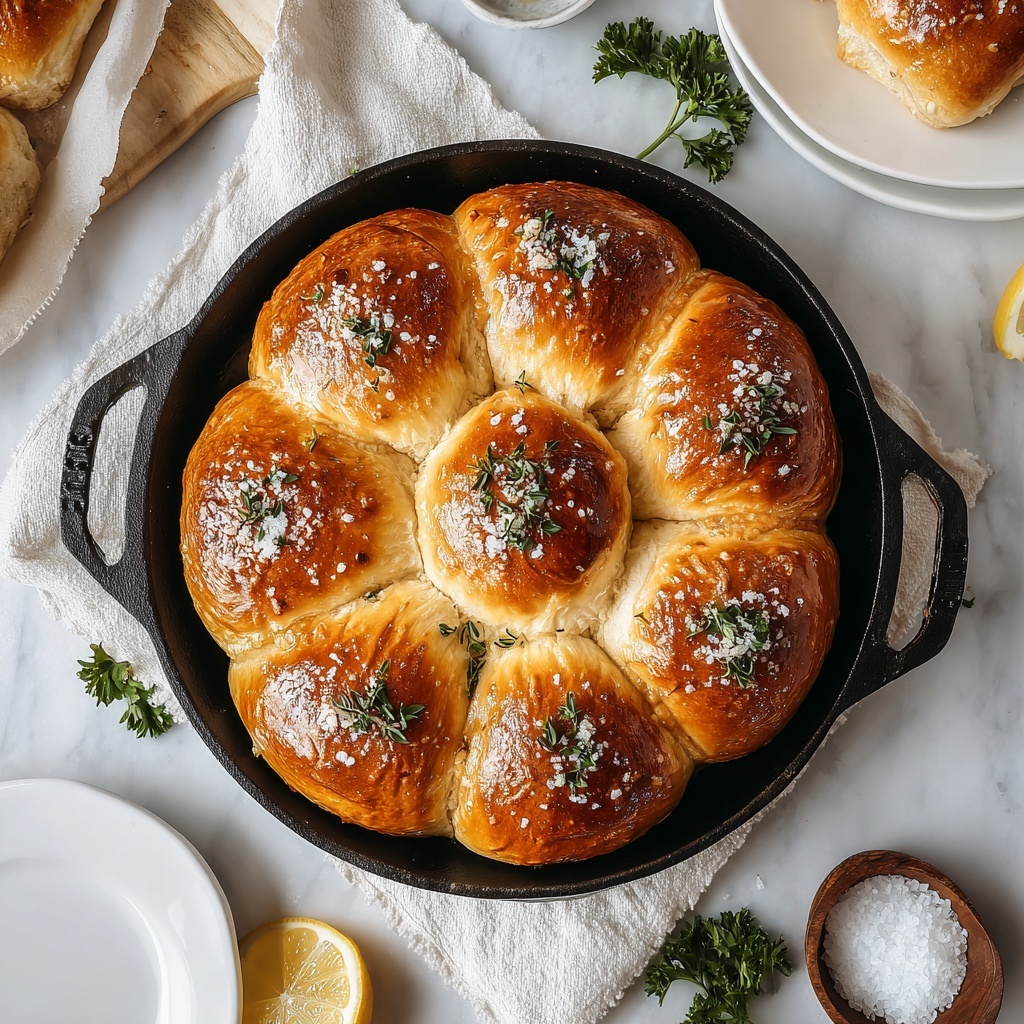
If you’ve been searching for a soft, fluffy, and irresistibly sweet bread that melts in your mouth, this Hawaiian Sweet Rolls Recipe will be your new best friend in the kitchen. Bursting with a hint of tropical pineapple sweetness and a golden crust, these rolls bring a perfect balance of flavor and texture that will elevate any meal, from casual dinners to festive gatherings. Whether you’re new to baking or an experienced bread lover, this recipe is approachable and guaranteed to impress everyone at your table.

Ingredients You’ll Need
Creating these delightful Hawaiian sweet rolls is surprisingly simple, yet every ingredient plays a crucial role in crafting their tender crumb and rich flavor. From the pineapple juice that adds a unique tropical sweetness to the eggs and butter that enrich the dough, each component blends beautifully to bring these rolls to life.
- Pineapple juice: Adds natural sweetness and a subtle tang that is the signature flavor of Hawaiian rolls.
- Milk: Contributes to the soft texture and helps activate the yeast.
- Butter: Provides richness and moisture, resulting in tender rolls.
- Sugar: Enhances the sweetness and helps with browning during baking.
- Salt: Balances the sweetness and strengthens the dough structure.
- All-purpose flour: The base of the dough offering structure and chewiness.
- Active dry yeast: Leavens the bread, making it rise and become fluffy.
- Eggs: Add richness, color, and help bind the dough together.
How to Make Hawaiian Sweet Rolls Recipe
Step 1: Prepare the Pineapple Mixture
Begin by combining the pineapple juice, milk, butter, sugar, and salt in a small saucepan. Gently heat this mixture over low heat just until the butter melts. This warm mixture is essential for activating your yeast later, so let it cool down to around 110°F before moving on. Patience here ensures your dough will rise perfectly.
Step 2: Mix Flour and Yeast
In a large mixing bowl, whisk together 2 cups of all-purpose flour and the active dry yeast. When the pineapple mixture is at the right temperature, pour it over the flour and yeast, stirring until everything is well combined. This step kickstarts the magic of bread making with a tropical twist.
Step 3: Add Eggs and Remaining Flour
Next, add the eggs one at a time, mixing thoroughly after each addition. This helps to fully incorporate the eggs into the dough for a rich texture. Gradually add the remaining 2 cups of flour, stirring until a soft dough begins to form. This gradual addition prevents the dough from becoming too stiff.
Step 4: Knead and First Rise
Turn your dough out onto a floured surface and knead for about 6 to 8 minutes. You’ll want to achieve a smooth, elastic dough, which is a sign the gluten has developed properly. Place the dough in a greased bowl, turning it to coat all sides. Cover with a clean towel and let it rise in a warm spot for about 1 hour, or until it has doubled in size. This is when the yeast creates those airy bubbles that give bread its delightful texture.
Step 5: Shape the Rolls
Once your dough has doubled, punch it down to release the air. Divide it into 15 equal portions and shape each piece into a neat ball. Arrange these balls in a greased 9×13-inch baking pan, spacing them evenly. Cover them again and let this second rise happen for about 30 minutes. You’ll notice them puffing up and getting ready to become golden, fluffy rolls.
Step 6: Bake to Perfection
Preheat your oven to 350°F (175°C). Bake the rolls for 20 to 25 minutes, watching for a golden brown top and a hollow sound when gently tapped — that’s your sign the rolls are perfectly baked. The aroma during baking will have your kitchen smelling like a tropical bakery.
Step 7: Add the Finishing Touch
Right after pulling the rolls from the oven, brush their tops with melted butter. This step adds a glossy finish and extra richness, sealing in moisture so the rolls stay tender longer. Allow them to cool slightly before serving to enjoy the full flavor and texture of your homemade Hawaiian sweet rolls.
How to Serve Hawaiian Sweet Rolls Recipe
Garnishes
A simple brush of melted butter is all you need to dress up these rolls, but for a festive touch, try sprinkling the tops with a little shredded coconut or a light dusting of cinnamon sugar before baking. These additions highlight the tropical vibe and add an extra layer of flavor that’s truly delightful.
Side Dishes
Hawaiian sweet rolls are wonderful alongside savory mains such as pulled pork, roasted chicken, or ham. Their subtle sweetness complements smoky, salty, and spicy flavors perfectly. They also make great sliders or sandwich buns, pairing beautifully with classic favorites or creative fillings alike.
Creative Ways to Present
For gatherings, consider serving the rolls warm in a buttered basket lined with a colorful cloth napkin to enhance their tropical charm. You can also slice them in half and use as mini sandwich buns, or even hollow out the centers for small sliders filled with pulled pork or grilled veggies. These little rolls are as versatile as they are delicious.
Make Ahead and Storage
Storing Leftovers
If you don’t devour the entire batch at once, store leftover Hawaiian sweet rolls in an airtight container or resealable plastic bag at room temperature for up to three days. This helps them stay soft and fresh, perfect for snacking or making sandwiches later.
Freezing
To keep these rolls fresh longer, freeze them individually wrapped in plastic wrap and then placed in a freezer bag. They can stay in the freezer for up to three months without losing their delightful texture or flavor. Just thaw them overnight in the fridge before reheating.
Reheating
When you’re ready to enjoy your rolls again, warm them gently in the oven at 300°F (150°C) for about 10 minutes or microwave them wrapped in a slightly damp paper towel for 15-20 seconds. This will revive that fresh-baked softness that makes them so irresistible.
FAQs
Can I substitute the pineapple juice with something else?
Pineapple juice gives Hawaiian sweet rolls their unique flavor and natural sweetness, so it’s best to stick with it for an authentic taste. If you don’t have pineapple juice, you might try orange juice or apple juice, but the flavor will be different and less tropical.
How do I know if my yeast is still active?
To test active dry yeast, dissolve it in warm water or liquid (about 110°F) with a pinch of sugar. Within 5 to 10 minutes, it should foam and bubble, indicating it’s alive and ready to rise your dough. If nothing happens, it’s time to get fresh yeast.
Can I make these rolls dairy-free?
Absolutely! You can swap the milk for a plant-based alternative like almond or oat milk and use a dairy-free butter substitute. This will still yield delicious rolls, though the texture might be slightly different but still wonderfully soft and flavorful.
Is it okay to use bread flour instead of all-purpose flour?
Yes, bread flour can be used and will give you a chewier texture due to its higher protein content. However, the traditional softness of Hawaiian sweet rolls might be slightly less pronounced. Either way, your rolls will still taste fantastic.
Can I add extra ingredients like coconut or macadamia nuts?
Definitely! Adding shredded coconut or chopped macadamia nuts into the dough or sprinkled on top can enhance the tropical character and add interesting textures. Just be careful not to add too much, which might affect the dough structure.
Final Thoughts
Your kitchen is about to be filled with the enchanting scent of freshly baked Hawaiian sweet rolls when you try this recipe. I can’t recommend it enough for those moments when you want something warm, soft, and naturally sweet that everyone will love. Give this Hawaiian Sweet Rolls Recipe a go—you’ll be sharing it with friends and family again and again!
Print
Hawaiian Sweet Rolls Recipe
- Prep Time: 0h 30m
- Cook Time: 0h 20m
- Total Time: 1h 50m
- Yield: 15 rolls
- Category: Bread
- Method: Baking
- Cuisine: Hawaiian
- Diet: Vegetarian
Description
These homemade Hawaiian Sweet Rolls are soft, fluffy, and slightly sweet with a wonderful hint of pineapple. Perfect as a side for any meal or as delicious slider buns, these rolls combine tropical flavors with a classic yeast dough and are baked to golden perfection.
Ingredients
Wet Ingredients
- 3/4 cup pineapple juice
- 1/4 cup milk
- 1/2 cup butter
- 3 eggs
Dry Ingredients
- 1/4 cup sugar
- 1 teaspoon salt
- 4 cups all-purpose flour
- 2 1/4 teaspoons active dry yeast
Instructions
- Prepare the liquid mixture: Combine the pineapple juice, milk, butter, sugar, and salt in a small saucepan. Heat over low heat until the butter is melted. Remove from heat and allow the mixture to cool to about 110°F, ensuring it’s warm but not too hot for the yeast.
- Activate yeast and begin dough: In a large mixing bowl, combine 2 cups of flour and the active dry yeast. Pour in the warm pineapple juice mixture and stir until well combined to initiate the dough formation.
- Add eggs and remaining flour: Beat in the eggs one at a time, mixing well after each addition. Gradually add the remaining 2 cups of flour, stirring until a soft, workable dough forms.
- Knead the dough: On a floured surface, knead the dough for 6-8 minutes until it becomes smooth and elastic, which develops the gluten for a perfect texture.
- First rise: Place the kneaded dough in a greased bowl, turning once to coat all sides. Cover with a clean towel and allow it to rise in a warm spot for about 1 hour, or until the dough doubles in size.
- Shape the rolls: Punch down the risen dough to release gas. Divide it into 15 equal pieces and shape each into a ball. Place the balls evenly in a greased 9×13-inch baking pan, cover with a towel, and let them rise for an additional 30 minutes until puffy.
- Bake: Preheat the oven to 350°F (175°C). Bake the rolls for 20-25 minutes until the tops are golden brown and the rolls sound hollow when tapped, indicating they are fully baked.
- Finish and serve: Remove the rolls from the oven and brush the tops with melted butter for added flavor and shine. Let them cool slightly before serving warm and enjoying their soft, sweet taste.
Notes
- Make sure the liquid mixture is not too hot when adding to the yeast to prevent killing the yeast.
- Kneading time is crucial for gluten development and soft texture; be patient and thorough.
- Allowing the dough to rise sufficiently ensures light and fluffy rolls.
- Brushing the tops with melted butter after baking keeps the rolls moist and adds a nice sheen.
- For a sweeter flavor, you can add a bit more sugar if desired.


