
“`html
If you’ve been searching for an incredibly creamy, flavorful, and downright addictive dip, this Homemade Hummus Recipe is going to become your new best friend in the kitchen. With its perfect blend of tender chickpeas, bright lemon juice, rich tahini, and just the right amount of spice, it elevates simple ingredients to something truly special. Whether you’re planning a casual get-together, a snack attack, or a sophisticated appetizer, this recipe strikes the perfect balance of texture and taste that will have everyone coming back for more.
Ingredients You’ll Need
These ingredients may be pantry staples, but they each play an essential role in achieving that silky texture, vibrant flavor, and beautiful golden color that makes this Homemade Hummus Recipe stand out. Preparing this dip with such simple components is easier than you might expect and incredibly rewarding.
- Chickpeas: The star of the show, providing a creamy base loaded with protein and fiber.
- Baking soda: A trick to soften chickpeas quickly and help remove skins for ultra-smooth hummus.
- Garlic cloves (unpeeled): Adds a mellow garlic flavor when softened during cooking.
- Flaked sea salt or kosher salt: Balances and enhances all the flavors.
- Freshly squeezed lemon juice: Brings essential brightness and a hint of acidity.
- Tahini: A creamy sesame paste that gives hummus its signature richness.
- Ground cumin: Adds a warm, earthy undertone to elevate the flavor profile.
- Crushed red pepper flakes: A subtle touch of heat to keep things exciting.
- Good-quality olive oil: For drizzling and enriching the final presentation.
- Optional garnishes—toasted pine nuts, chopped parsley, smoked or sweet paprika: These add color, crunch, and complex flavor layers.
- Pita chips and crudités: Perfect companions for serving your delicious homemade hummus.
How to Make Homemade Hummus Recipe
Step 1: Soften and Peel the Chickpeas
This is where the magic begins. Start by placing the drained chickpeas in a large pot and cover them with cold water, seasoning the water with baking soda. As the chickpeas simmer gently, the baking soda works its wonders softening them and loosening the skins, which we skim off multiple times to get an ultra-smooth texture. This step may take a little patience but trust me, it’s absolutely worth the silky final result.
Step 2: Prepare the Garlic and Lemon Base
While your chickpeas simmer, pop unpeeled garlic cloves, salt, and freshly squeezed lemon juice into a food processor. Pulse until almost pureed, then let it rest for about 10 minutes to mellow out the sharpness of the garlic. The key here is to press the mix through a fine sieve, extracting all that garlicky, lemony liquid while leaving behind the solids. This juice infuses your hummus with that signature tangy, garlicky depth.
Step 3: Combine Tahini, Spices, and Ice Water
Next, add tahini along with cumin and crushed red pepper flakes to the lemon-garlic liquid. Pulse briefly, then slowly add ice water to the mix while processing until smooth and luxuriously creamy. The tahini can seize up initially but don’t worry—keep adding water and blending until you reach a velvety texture that’s thick yet luscious.
Step 4: Blend the Chickpeas Into Creaminess
Drain your cooked chickpeas and add them to the food processor with the tahini mixture. Process until your hummus is ultra smooth, stopping occasionally to scrape down the sides. If it feels thick, add water tablespoon by tablespoon, then blend some more until it becomes fluffy, light, and irresistibly creamy. This is where you achieve that perfect balance between body and silkiness.
Step 5: Season to Your Taste
Time to fine-tune the flavors! Taste your hummus and adjust the seasoning with additional salt, lemon juice, or cumin as you prefer. This personal twist ensures each batch perfectly suits your palate.
Step 6: Dress and Garnish
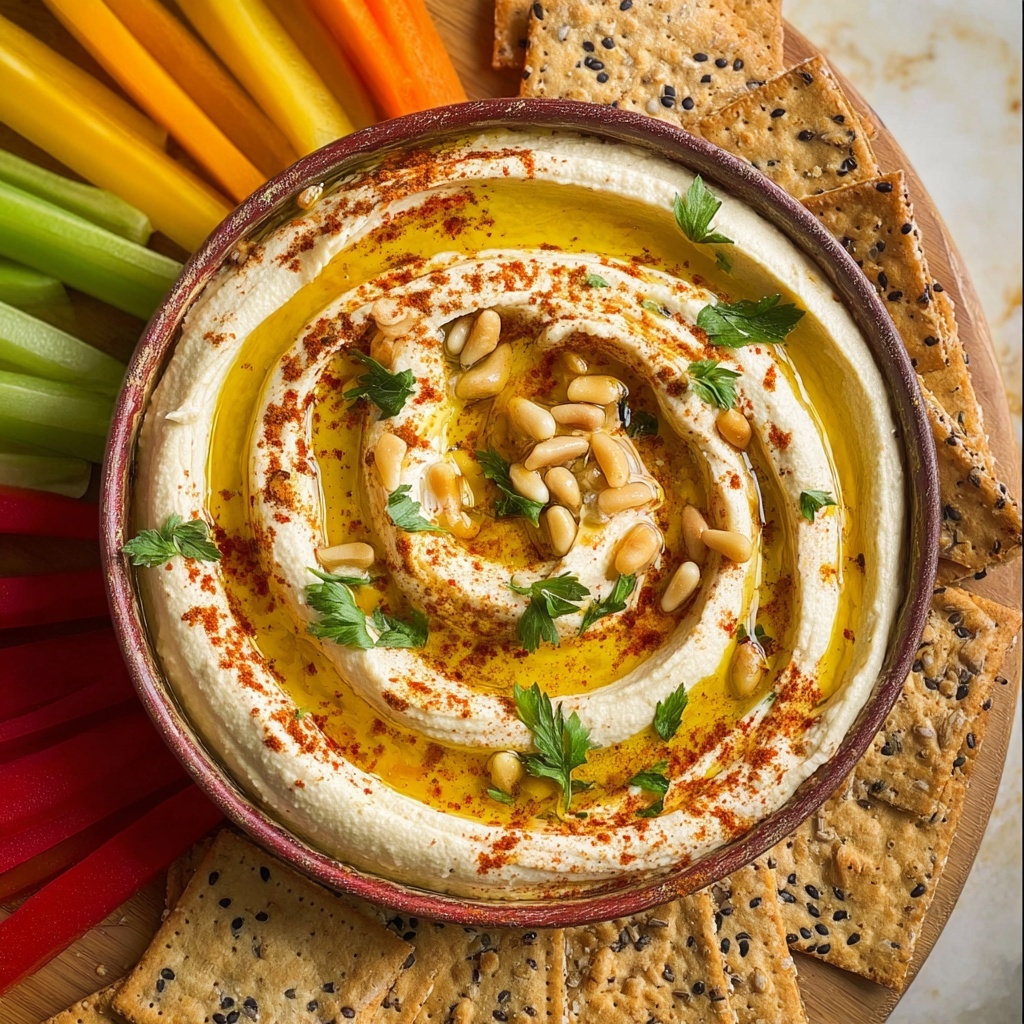
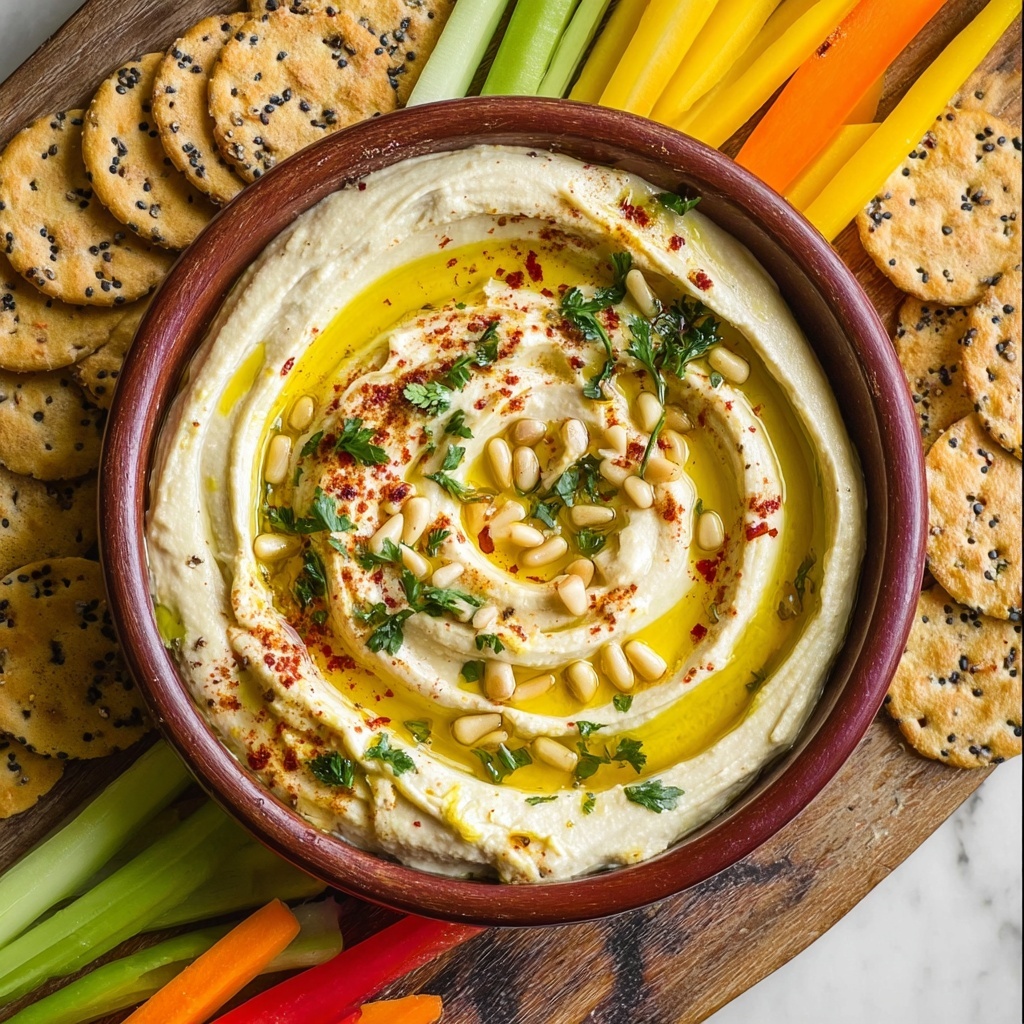
Transfer your finished homemade hummus to a shallow serving dish. Drizzle generously with high-quality olive oil, then sprinkle toasted pine nuts, a dusting of smoked or sweet paprika, and finely chopped parsley for a gorgeous and flavorful finish. You can also add a few whole chickpeas on top for a rustic flair.
Step 7: Serve with Your Favorite Accompaniments
Whether pita chips, crisp crudités, or crunchy tortilla chips, serve your homemade hummus alongside an array of dippers. This makes for a colorful, inviting platter perfect for sharing or savoring solo.
Step 8: Enjoy!
Now comes the best part – digging in! The creamy texture, bright flavors, and just the right heat from the red pepper flakes will make it impossible not to go back for seconds. This Homemade Hummus Recipe truly captures everything you want in a wholesome, delicious dip.
How to Serve Homemade Hummus Recipe
Garnishes
Adding garnishes is both an art and a pleasure. Toasted pine nuts lend a delicate crunch and buttery bite, while chopped parsley adds a fresh, green note to balance richness. A sprinkle of smoked or sweet paprika not only gives a pop of color but introduces a subtle smoky or sweet flavor that takes the hummus from simple to spectacular.
Side Dishes
Hummus pairs beautifully with all sorts of sides. Soft, fluffy pita chips make classic companions, while crunchy veggies like carrots, cucumbers, and bell peppers are perfect for dipping and add a refreshing contrast. For a more substantial snack or light meal, try serving with warm flatbreads or alongside grilled meats and salads.
Creative Ways to Present
Think beyond the bowl! Spread your Homemade Hummus Recipe on a flat plate in a thin layer, then drizzle olive oil and swirl it with a spoon to create an inviting pattern. Top with garnishes in colorful clusters or bright patterns for an eye-catching centerpiece. You could also layer hummus with roasted veggies or use it as a sandwich spread to bring a Mediterranean flair to your lunch.
Make Ahead and Storage
Storing Leftovers
Your leftover hummus keeps beautifully in an airtight container in the refrigerator for up to a week. Before sealing, drizzle a thin layer of olive oil over the surface to keep it fresh and prevent it from drying out. Give it a good stir before serving again to revive that creamy texture.
Freezing
While fresh is always best, you can freeze hummus for up to three months in a freezer-safe container. Leave a little room at the top for expansion and thaw overnight in the fridge for best results. Note that the texture can change slightly after freezing, so a quick stir and a splash of olive oil or water can help bring it back to life.
Reheating
Hummus is enjoyed mostly chilled or at room temperature, so reheating is usually unnecessary. If you prefer it warmed, gently heat it in a bowl set over simmering water, stirring occasionally until just warm. Avoid microwaving directly, as it can dry out or cause uneven heating.
FAQs
Can I use dried chickpeas instead of canned?
Absolutely! Using dried chickpeas is fantastic and often results in an even smoother hummus. Just remember to soak them overnight and cook until very tender before starting the recipe. The step with baking soda helps speed this softening.
What can I substitute for tahini if I don’t have any?
If you don’t have tahini on hand, you can substitute with natural peanut butter or almond butter for a different but delicious twist. Just start with less and adjust for consistency and flavor since the nuttiness will vary.
How can I make my hummus extra smooth?
Removing chickpea skins is a game-changer here! The simmering and skimming step in this Homemade Hummus Recipe helps eliminate skins, creating a creamier texture. Also, using ice water to thin it while blending results in a luxuriously smooth finish.
Is this recipe vegan and gluten-free?
Yes, this homemade hummus is naturally vegan and gluten-free, making it a perfect healthy snack for a variety of dietary preferences and needs.
Can I adjust the garlic and spice levels?
Definitely! One of the best parts of this Homemade Hummus Recipe is how flexible it is. Feel free to add more garlic for boldness or reduce the red pepper flakes if you prefer it milder. It’s all about making it your own.
Final Thoughts
There’s truly nothing like homemade hummus, and this Homemade Hummus Recipe promises that same unforgettable creaminess and vibrant flavor every time you make it. With just a handful of simple ingredients and a little love, you’ll create a dip that’s perfect for any occasion — from casual snacks to elegant gatherings. I can’t wait for you to try it and fall in love just like I did!
“`
Print
Homemade Hummus Recipe
- Prep Time: 10 minutes
- Cook Time: 30 minutes
- Total Time: 40 minutes
- Yield: 8 servings
- Category: Dip
- Method: Stovetop
- Cuisine: Middle Eastern
- Diet: Vegetarian
Description
This homemade hummus recipe offers a creamy, flavorful, and smooth dip made from simmered chickpeas, tahini, garlic, lemon juice, and a blend of spices. Perfect as a healthy appetizer or snack, it can be served with pita chips, crudités, or your favorite crackers. The recipe includes steps to soften chickpeas, mellow the garlic, and achieve a luscious texture through careful blending.
Ingredients
Chickpeas
- 3 (15 ounce) cans chickpeas, drained
- 2 teaspoons baking soda
Garlic and Seasonings
- 3–4 cloves garlic, unpeeled
- 1 teaspoon flaked sea salt or kosher salt
- 4–6 tablespoons freshly squeezed lemon juice
- ¼–½ teaspoon ground cumin
- 1/8 teaspoon crushed red pepper flakes
Other Ingredients
- 2/3 cup tahini
- Good-quality olive oil, for drizzling
- Toasted pine nuts (optional)
- Chopped fresh parsley (optional)
- Smoked or sweet paprika (optional)
- Pita chips, tortilla chips, crudités, or crackers for serving
Instructions
- Simmer Chickpeas: Place the drained chickpeas in a large pot, cover with cold water by at least 2 inches, add 2 teaspoons baking soda, and stir. Bring to a boil over high heat, skim off any scum, then cover and reduce heat to low. Simmer for 30 minutes or until chickpeas begin to fall apart and are a little mushy. Frequently stir and skim off floating chickpea skins multiple times. Discard the skins.
- Prepare Garlic Mixture: While chickpeas cook, place garlic cloves, salt, and lemon juice in a food processor and process until nearly puréed. Transfer this to a small bowl and let sit for 10 minutes to mellow garlic flavor. Press the mixture firmly through a fine-mesh sieve to extract liquid; discard solids and return liquid to the food processor bowl.
- Mix Tahini and Spices: Add tahini, ground cumin, and crushed red pepper flakes to the garlic-lemon mixture. Pulse 5 times to combine. With the motor running, gradually add ¼ cup ice water by tablespoonfuls and process until the mixture is smooth, pale, and thick. Add more ice water if needed to achieve the right consistency.
- Blend Chickpeas: Add the cooked chickpeas to the food processor and blend until ultra smooth and creamy. Add additional ice water by tablespoons if necessary. Continue puréeing to make the hummus lighter, fluffier, and very smooth.
- Adjust Seasoning: Taste the hummus and season with additional salt, lemon juice, or cumin, if desired.
- Serve and Garnish: Transfer hummus to a shallow serving dish. Drizzle generously with good-quality olive oil. Garnish with toasted pine nuts, smoked or sweet paprika, finely chopped parsley, and whole chickpeas if desired.
- Accompaniments: Serve with pita chips, tortilla chips, crudités, or your favorite crackers for dipping.
- Enjoy: Dig into your creamy, homemade hummus and savor the fresh flavors and smooth texture!
Notes
- Skimming the chickpea skins multiple times is key to achieving the smoothest hummus texture.
- Allowing the garlic to mellow after processing helps reduce sharpness and bitterness.
- Adding ice water gradually helps achieve a smooth and fluffy consistency without thinning too much.
- Use fresh lemon juice for the best flavor.
- Optional toppings like pine nuts, parsley, and paprika add texture and visual appeal but can be omitted.
- Store leftovers in an airtight container in the refrigerator for up to 4-5 days.
- This recipe can be adjusted to taste by varying garlic, lemon, salt, and spice amounts.


