
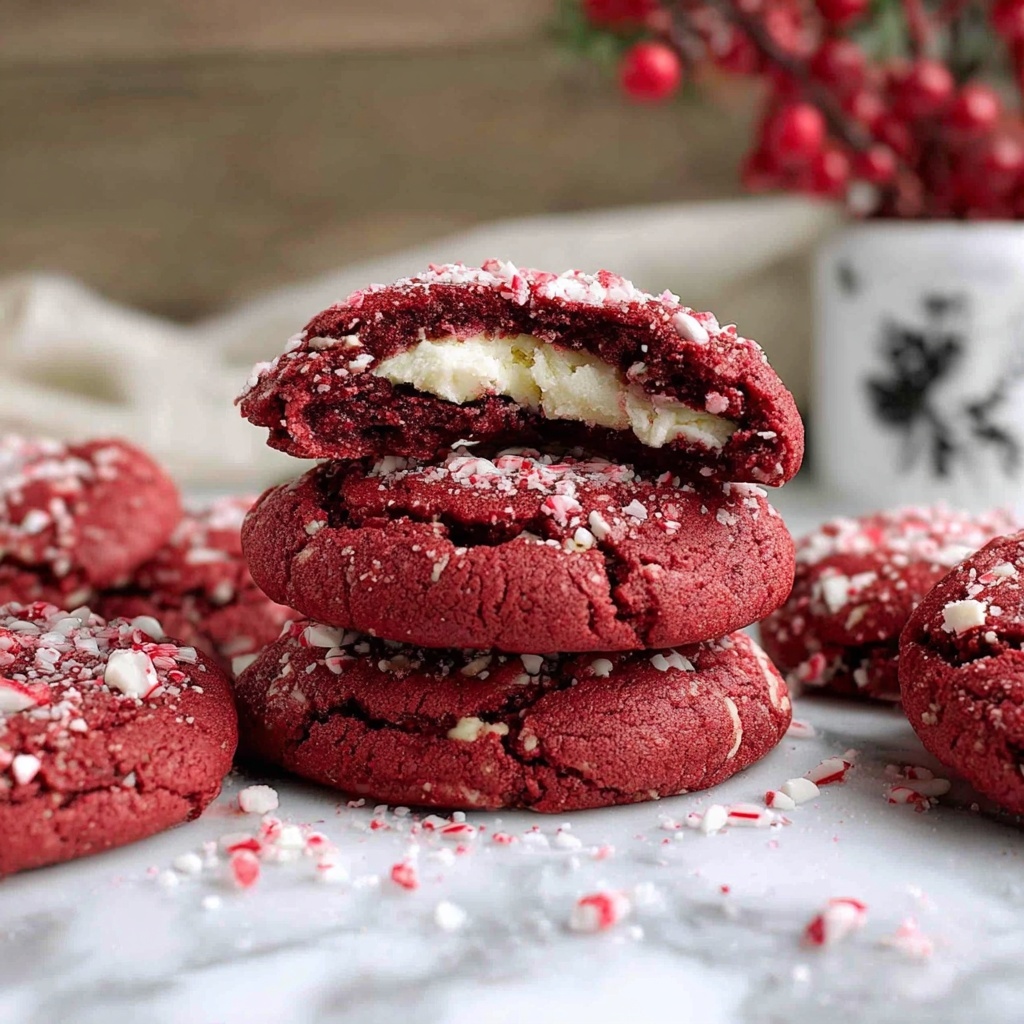
If you are looking to bring cozy holiday magic right into your kitchen, the Mrs. Claus Cookies Recipe is a delightful treat you simply cannot miss. These festive cookies combine luscious red hues with creamy white chocolate and a hint of chocolate chips, resulting in a bite-sized wonder that perfectly captures the joyous spirit of the season. They are equally charming on a holiday platter or as a homemade gift, making every bite feel like a warm hug straight from Mrs. Claus herself.

Ingredients You’ll Need
These ingredients are straightforward yet essential, blending to create the perfect balance of flavor, texture, and festive color that makes this Mrs. Claus Cookies Recipe so irresistible. Each ingredient plays a role, from the buttery base to the sweet candy cane bits that add a cheerful crunch.
- 1 cup butter (unsalted, cold cut into slices): Provides the rich, creamy foundation for tender cookies.
- 1 ½ cups sugar: Sweetens the dough and helps with the slightly crispy edges.
- 2 large eggs (room temp): Bind the ingredients together and add moisture for softness.
- 1 tsp vanilla extract: Enhances flavor with its warm, inviting aroma.
- 2 tsp food coloring (true red): Gives that iconic festive color, making each cookie pop with holiday cheer.
- 1 cup cake flour: Ensures a delicate, tender crumb in every bite.
- 1 ½ cups all-purpose flour: Adds structure without sacrificing softness.
- 1 tsp baking soda: Helps the cookies rise and keeps them light.
- 1 tsp cornstarch: Contributes to the cookie’s melt-in-your-mouth texture.
- ½ tsp salt: Balances sweetness and highlights flavors.
- ¼ cup cocoa powder: Brings a subtle chocolate note that deepens the flavor.
- 1 ½ cups white chocolate chips: Adds creamy bursts of sweetness throughout.
- 1 cup chocolate chips: For those delightful melty pockets of rich chocolate.
- Silicone mold (bite-sized): Shapes your cookies perfectly for charming, uniform bites.
- 2 cups white chocolate melting wafers: For a smooth coating that seals in the magic.
- ½ cup candy cane bits: Provides a refreshing peppermint crunch and festive crunch.
- ½ cup red decorating sugar: Sprinkles on top for extra sparkle and texture.
- ½ candy cane (crushed): Adds a finishing festive touch and brightens each cookie’s presentation.
How to Make Mrs. Claus Cookies Recipe
Step 1: Prepare Your Dough
Start by creaming together the cold butter slices and sugar until light and fluffy—that’s the key to tender cookies. Then beat in the eggs, vanilla extract, and vibrant red food coloring, making sure the color is evenly distributed to achieve that lovely festive glow. Mixing the wet ingredients first lets the color and flavor infuse the dough beautifully.
Step 2: Combine Dry Ingredients
In a separate bowl, whisk the cake flour, all-purpose flour, baking soda, cornstarch, salt, and cocoa powder. This mix ensures a perfect blend of softness and just the right structure. Gradually add the dry ingredients into the wet mix, stirring gently until everything comes together without overmixing, preserving that tender texture.
Step 3: Fold in the Chips
Carefully fold in both the white and regular chocolate chips, giving you that delicious dual chocolate surprise in every bite. This step is where the cookie gets its signature bursts of sweet creaminess juxtaposed with deep chocolate pockets.
Step 4: Mold the Cookies
Press the cookie dough firmly into your silicone bite-sized molds. This handy tool ensures uniform shapes and charming little cookies that look as good as they taste. A firmly packed mold is essential for clean edges when you unmold later.
Step 5: Bake to Perfection
Pop your molded cookies into a preheated oven at 350°F (175°C) for about 13 minutes, until edges are set but the center looks slightly soft. This way, you keep that melt-in-your-mouth functionality without overbaking.
Step 6: Coat with White Chocolate
Once cooled, dip each cookie in melted white chocolate wafers. This coating adds a creamy sweetness and seals in the moisture, making the cookies feel indulgent and festive.
Step 7: Decorate for Holiday Cheer
Sprinkle the still-wet coated cookies generously with crushed candy cane bits and red decorating sugar. The combination gives a peppermint crunch and sparkling finish that’s truly holiday perfection.
How to Serve Mrs. Claus Cookies Recipe
Garnishes
When serving these cookies, garnish your plate with fresh peppermint sticks or a few whole candy canes to complement the peppermint bits in the cookies. A dusting of powdered sugar can also add an extra snowy touch for a winter wonderland vibe.
Side Dishes
The best companions for these sweet bites are a warm mug of cocoa, peppermint tea, or even eggnog. Their creamy, warm profiles pair so nicely with the cool peppermint and rich chocolate in the cookies.
Creative Ways to Present
For a charming holiday treat, stack these cookies in a clear jar with layers of red and white crushed candy cane bits, tied with festive ribbon. You can also arrange them on a tiered dessert stand with small evergreen sprigs or holly leaves for a truly festive display perfect for sharing at holiday parties.
Make Ahead and Storage
Storing Leftovers
Keep your Mrs. Claus Cookies fresh by storing them in an airtight container at room temperature. This helps maintain their soft texture and crisp coating for up to a week. Place parchment paper between layers to prevent sticking.
Freezing
These cookies freeze wonderfully! Place them in a single layer on a baking sheet to flash freeze, then transfer to a zip-top bag or airtight container. They will keep well in the freezer for up to 3 months. Thaw at room temperature before serving.
Reheating
To enjoy the cookies warm, gently reheat them in a low oven for 5 minutes or until slightly warmed through. Avoid microwaving, which can melt the white chocolate coating unevenly—slow heat is the way to keep their charm intact.
FAQs
Can I use regular flour instead of cake flour?
Yes, you can substitute all cake flour with all-purpose flour, but your cookies may be slightly less tender since cake flour has a lower protein content that contributes to a softer texture.
Is there a way to make these cookies without food coloring?
Absolutely! The red hue is festive, but if you prefer natural options, substitute with beet powder for color or simply enjoy the cookie dough’s natural rich tones without any coloring.
Can I skip the candy cane bits?
If peppermint isn’t your thing, you can omit the candy cane bits or replace them with crushed nuts or dried cranberries for a different winter twist.
How long do these cookies keep fresh?
Stored properly in an airtight container, Mrs. Claus Cookies stay fresh for up to one week at room temperature, making them perfect for baking ahead during the holiday rush.
Can I double this recipe for larger batches?
Yes, definitely! Just double all ingredients and bake in batches. Using silicone molds makes it easy to handle larger quantities without losing any of the cookie’s signature charm.
Final Thoughts
The Mrs. Claus Cookies Recipe is truly a festive gem you’ll want to make year after year. Simple to prepare yet irresistibly charming and delicious, these cookies bring holiday spirit to any gathering. Whether you’re gifting them to loved ones or sneaking a few by the fireplace, these cookies invite warmth, sweetness, and joy into your holidays. So go ahead—put on your favorite Christmas tunes, roll up your sleeves, and let this recipe create some sweet holiday magic in your home!
Print
Mrs. Claus Cookies Recipe
- Prep Time: 25 minutes
- Cook Time: 13 minutes
- Total Time: 38 minutes
- Yield: 12 cookies
- Category: Dessert
- Method: Baking
- Cuisine: American
Description
Mrs. Claus Cookies are festive, bite-sized treats bursting with vibrant red color and rich white and dark chocolate flavors. These soft, chewy cookies are infused with cocoa powder and decorated with candy cane bits and red sugar, perfect for holiday celebrations and sharing joyful moments.
Ingredients
Dough
- 1 cup unsalted butter, cold and cut into slices
- 1 ½ cups sugar
- 2 large eggs, room temperature
- 1 tsp vanilla extract
- 2 tsp true red food coloring
- 1 cup cake flour
- 1 ½ cups all-purpose flour
- 1 tsp baking soda
- 1 tsp cornstarch
- ½ tsp salt
- ¼ cup cocoa powder
Chocolate Chips
- 1 ½ cups white chocolate chips
- 1 cup chocolate chips
Decorations & Tools
- Silicone mold (bite-sized)
- 2 cups white chocolate melting wafers
- ½ cup candy cane bits
- ½ cup red decorating sugar
- ½ candy canes, crushed
Instructions
- Prepare the Dough: In a large mixing bowl, cream together the cold sliced butter and 1 ½ cups of sugar until light and fluffy. Add the eggs one at a time, mixing well after each addition. Stir in the vanilla extract and red food coloring until uniformly colored.
- Combine Dry Ingredients: In a separate bowl, sift together the cake flour, all-purpose flour, baking soda, cornstarch, salt, and cocoa powder. Gradually add the dry ingredients to the wet mixture and mix until just combined. Fold in the white and dark chocolate chips, ensuring they are evenly distributed throughout the dough.
- Fill Silicone Mold: Using a silicone mold designed for bite-sized treats, fill each cavity with the prepared cookie dough, smoothing the tops with a spatula or your fingers. Remove any excess dough to create even shapes.
- Bake the Cookies: Preheat your oven to 350°F (175°C). Place the filled silicone mold on a baking sheet and bake for approximately 13 minutes or until the cookies are set and slightly firm to the touch. Avoid overbaking to maintain a soft texture.
- Cool the Cookies: Remove the baked cookies from the oven and allow them to cool in the mold for 5-10 minutes. Once partially cooled, gently pop the cookies out onto a wire rack to cool completely.
- Melt White Chocolate: In a microwave-safe bowl, melt the white chocolate melting wafers in 30-second intervals, stirring in between until smooth and glossy.
- Decorate the Cookies: Dip the top of each cookie into the melted white chocolate or drizzle it on top. Immediately sprinkle with candy cane bits, crushed candy canes, and red decorating sugar before the chocolate sets to achieve a festive look.
- Set the Decorations: Place the decorated cookies on parchment paper or a wire rack and allow the white chocolate to harden completely at room temperature or in the refrigerator, about 20-30 minutes.
- Serve and Store: Serve these delightful Mrs. Claus Cookies at your holiday gatherings or keep them stored in an airtight container at room temperature for up to one week.
Notes
- Ensure the butter is cold for better dough texture and shape retention.
- Use silicone molds for uniform, bite-sized cookie pieces.
- Room temperature eggs help create a smoother batter.
- Adjust food coloring amount to achieve desired intensity of red color.
- Store cookies in an airtight container to maintain freshness up to one week.
- For a stronger peppermint flavor, add a few drops of peppermint extract along with vanilla.


