If you’re looking for a festive and absolutely adorable treat that’s as fun to make as it is to eat, then you are in for a real treat with this Easy Olaf Cupcakes Recipe. These charming cupcakes capture the spirit of everyone’s favorite snowman with their sweet, snowy design and playful decorations. Perfect for a chilly celebration or any time you want to bring a bit of magic to your dessert table, these cupcakes will have all your family and friends smiling with every bite.
Ingredients You’ll Need
The best part about this Easy Olaf Cupcakes Recipe is how straightforward and accessible the ingredients are. Each component works perfectly to create the snowy, whimsical vibe that makes these cupcakes so special, from the moist base to the delicate touches of frosting and sprinkles.
- Cupcake of Choice: Pick your favorite flavor as the base—vanilla, chocolate, or something more adventurous. It’s the canvas for Olaf’s snowy charm.
- White frosting: Creamy and smooth for the perfect snowfall effect, it’s the frosting that lets you get creative.
- Blue food coloring: Just a few drops transform the white frosting into a gentle sky-blue hue to give that winter day feel.
- Mini marshmallows: Cut in half to craft Olaf’s body and give him that puffed-up snow look.
- Marshmallow bits: Small, perfect details for Olaf’s feet that add softness and texture.
- Chocolate & orange jimmies: Use chocolate jimmies for eyebrows, arms, hair, and buttons, and orange for the iconic carrot nose.
- White sprinkles: These bring a touch of sparkling snow around Olaf, enhancing the winter wonderland effect.
- 1 tootsie roll: A small piece slices perfectly for Olaf’s expressive mouth, giving the cupcake personality and warmth.
How to Make Easy Olaf Cupcakes Recipe
Step 1: Bake Your Cupcakes
Start by preparing your cupcakes according to the instructions for your chosen flavor—whether it’s a box mix or a favorite homemade recipe. Once baked, allow them to cool completely before you begin decorating. This is the perfect first step because a cool cupcake lets the frosting hold firm, setting the stage for Olaf’s wintery makeover.
Step 2: Tint and Frost
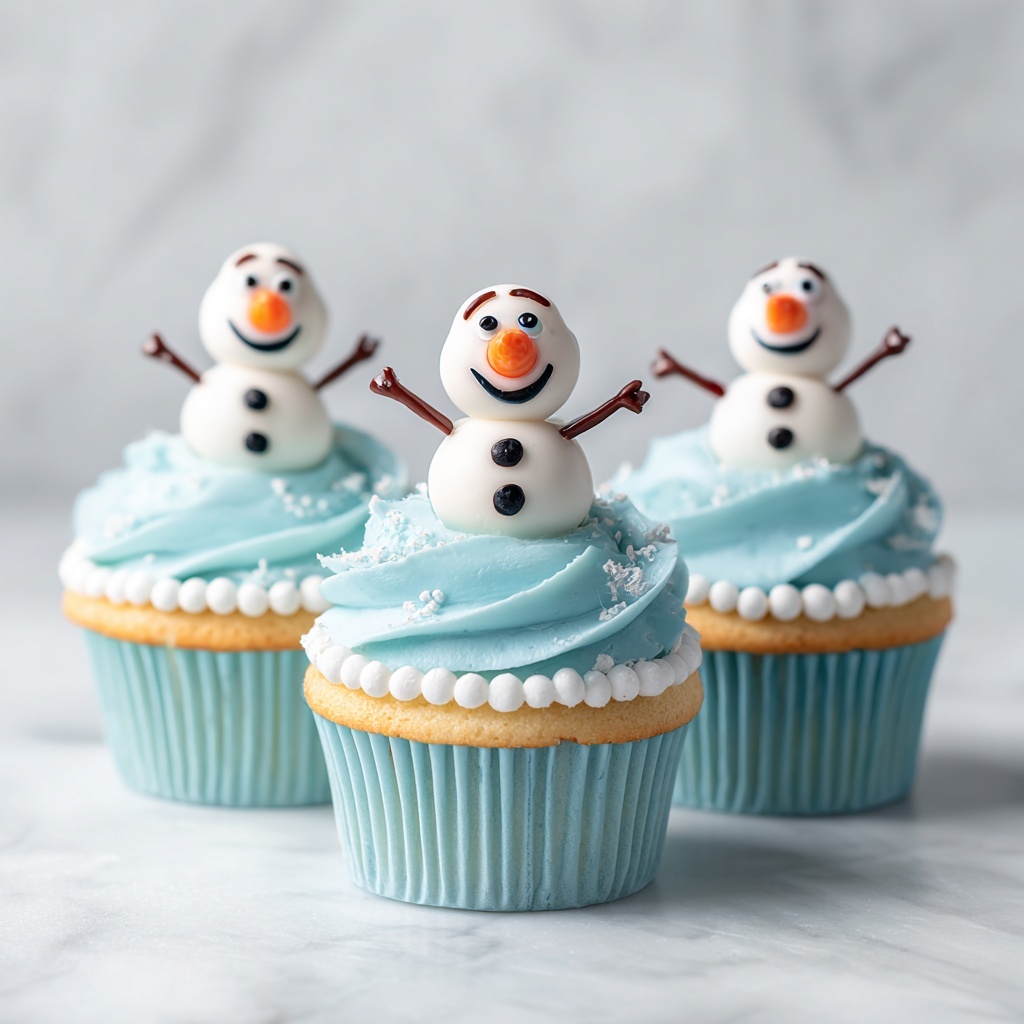
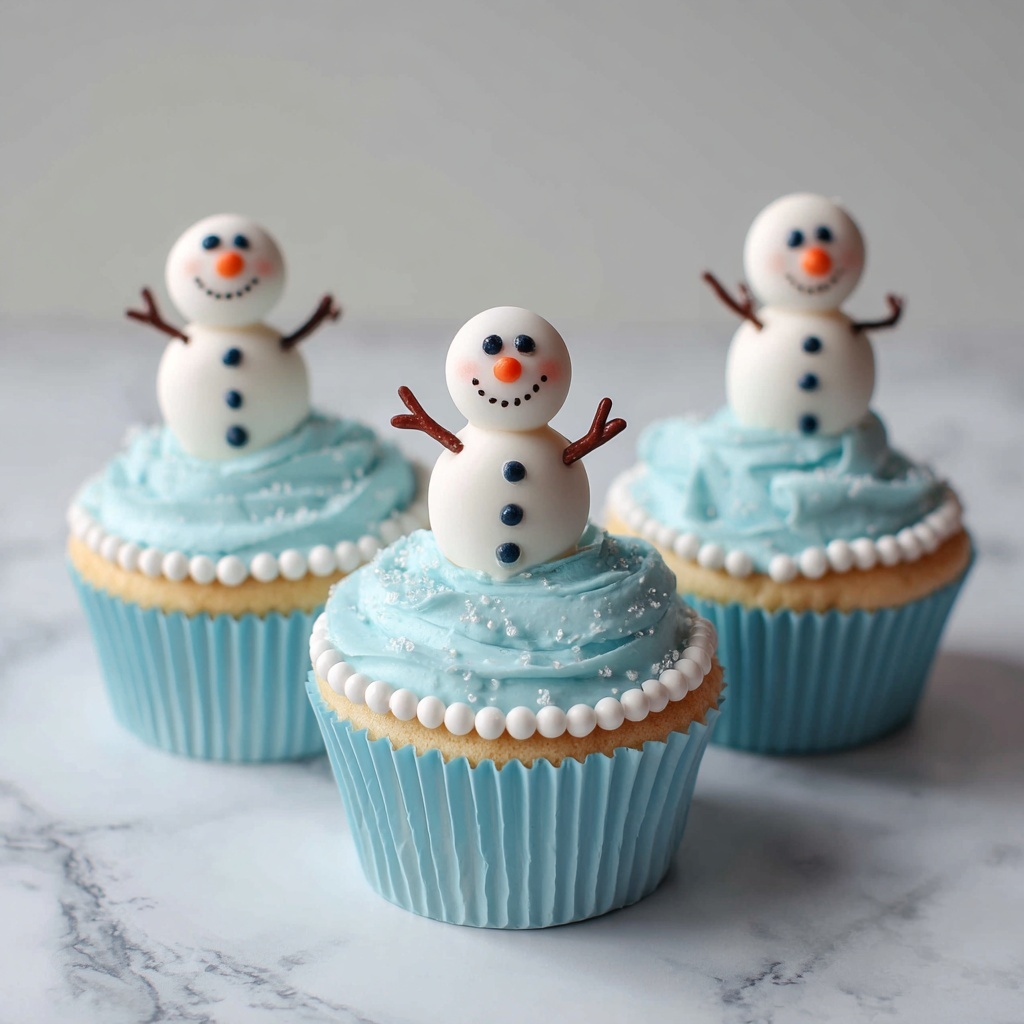
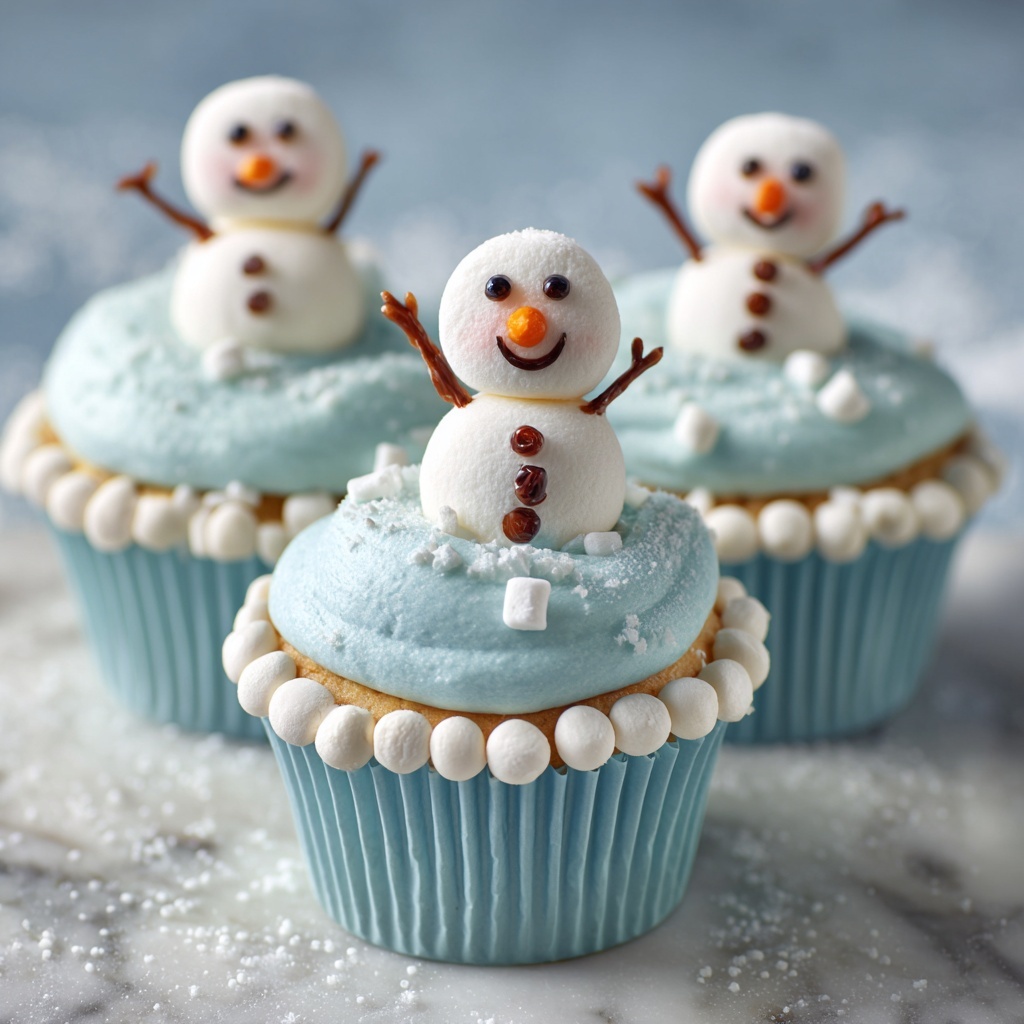
Blend a few drops of blue food coloring into your white frosting until you achieve a delicate sky-blue shade. This step is key because it creates the perfect backdrop, evoking a crisp, chilly day. Then, generously frost each cupcake with this tinted frosting, covering the top evenly. For an extra snowy effect, gently press the bottom edges of each cupcake into white sprinkles, mimicking freshly fallen snow under Olaf’s feet.
Step 3: Build Olaf’s Body and Features
Take your mini marshmallows and cut each in half. Arrange three halves stacked atop each other just above the sprinkle “snow” to form Olaf’s signature round body. Next, add two marshmallow bits near the bottom to represent his feet. Use chocolate jimmies to fashion his arms, hair, eyebrows, and little buttons—breaking off small tips to shape his expressive eyes. It’s these charming details that bring your cupcakes to life and fill the room with smiles.
Step 4: Add Final Touches
Use orange jimmies to place Olaf’s classic carrot nose right in the center of his face. Carefully snip tiny pieces from a Tootsie Roll with kitchen scissors to create his happy mouth, completing that cheerful expression. Finally, scatter white sprinkles around Olaf on the frosting to look like delicate snowflakes drifting down, perfecting your winter scene.
How to Serve Easy Olaf Cupcakes Recipe
Garnishes
Consider adding a whimsical touch with edible glitter or a sprinkle of powdered sugar dusted lightly over the cupcakes just before serving. Fresh mint leaves or a few small candy snowflakes around the plate can enhance the wintry vibe and create a visually delightful presentation that will impress guests of all ages.
Side Dishes
These cupcakes shine on their own but pairing them with a warm cup of spiced hot chocolate or a light vanilla bean milkshake makes the experience even cozier. For a brunch or party spread, fresh fruit platters featuring crisp apples and juicy pears bring a refreshing balance to the sweet and creamy cupcakes.
Creative Ways to Present
Try arranging the cupcakes on a cake stand surrounded by faux snow or cotton batting for an enchanted winter display. You can also place the cupcakes in themed cupcake liners featuring snowflakes or winter motifs to boost the festive atmosphere. Little name tags or playful signs referencing Olaf and his snowy adventures add a cute storytelling element kids and adults will adore.
Make Ahead and Storage
Storing Leftovers
Simply cover the cupcakes with a cake dome or place them in an airtight container to keep them fresh for up to three days at room temperature. The frosting stays soft, and Olaf’s snowman details maintain their charm with careful storage away from heat and humidity.
Freezing
Easy Olaf Cupcakes Recipe also freezes well! Wrap each cupcake individually in plastic wrap, then store them in a freezer-safe container for up to two months. When you’re ready to enjoy, thaw them in the refrigerator overnight to preserve the frosting quality and decorations.
Reheating
Since these cupcakes are best enjoyed cool, avoid applying heat directly. Instead, let frozen cupcakes come to room temperature naturally before serving. This method keeps the frosting intact and maintains Olaf’s adorable appearance without melting or smudging.
FAQs
Can I use a different frosting color if I don’t have blue food coloring?
Absolutely! While a soft blue gives that chilly sky effect, you can frost with plain white or even a light lavender for a whimsical twist. The most important thing is a smooth surface to showcase Olaf’s snowy details.
What if I don’t have mini marshmallows?
If mini marshmallows are hard to find, regular-sized marshmallows cut into smaller pieces work just fine. Alternatively, small white candies or fondant circles can be used to give Olaf his signature snowball body.
Can I make these cupcakes dairy-free?
Yes, you can use dairy-free frosting options and any non-dairy milk alternatives in your cupcake mix. Many vegan marshmallows and sprinkles are available nowadays which make this recipe easily adaptable for dairy-free diets.
How do I keep the Tootsie Roll mouth from melting into the frosting?
For best results, make sure your frosting is chilled and firm before adding the Tootsie Roll pieces. Press them gently onto the frosting and refrigerate the cupcakes to help the mouth set firmly in place.
Is this recipe suitable for kids to help make?
Definitely! Decorating Easy Olaf Cupcakes Recipe is a fun, hands-on activity that kids love. Just supervise the cutting of marshmallows and Tootsie Rolls, and let them get creative placing the sprinkles and jimmies for Olaf’s features.
Final Thoughts
There is something truly magical about sharing these Easy Olaf Cupcakes Recipe creations with your loved ones. The endearing charm of Olaf captured in a cupcake brings joy and a touch of winter whimsy no matter the season. Give this recipe a try—you’ll find it’s as delightful to bake as it is to devour, and your friends and family will thank you for the sweet smiles and memories it creates.
Print
Easy Olaf Cupcakes Recipe
- Prep Time: 15 minutes
- Cook Time: 20 minutes
- Total Time: 35 minutes
- Yield: 12 cupcakes
- Category: Dessert
- Method: Baking
- Cuisine: American
Description
Create delightful Olaf-themed cupcakes inspired by the beloved Frozen character. These cupcakes feature light blue frosting, playful marshmallow snowmen decorations, and sweet candy details that bring Olaf to life in a fun and easy way, perfect for parties or a whimsical treat.
Ingredients
Cupcake Base
- 12 cupcakes of your choice, baked
Frosting and Decoration
- White frosting, enough to cover 12 cupcakes
- Blue food coloring, a few drops to tint frosting light blue
- Mini marshmallows, about 36 halves (18 whole mini marshmallows)
- Marshmallow bits, about 12 pieces
- Chocolate jimmies, approximately 24 pieces (for arms, hair, eyebrows, buttons, eyes)
- Orange jimmies, about 12 pieces (for nose)
- White sprinkles, approximately 2 tablespoons
- 1 Tootsie Roll, cut into tiny pieces for mouth
Instructions
- Prepare Cupcakes: Make your cupcakes according to your chosen recipe or package instructions. Ensure they are fully baked and cooled before decorating.
- Color and Frost: Tint the white frosting with a few drops of blue food coloring until a soft sky-blue color is achieved. Use this to frost each cupcake evenly. Dip the bottom edges of each frosted cupcake into white sprinkles to create a snowy effect.
- Create Olaf’s Body and Feet: Cut the mini marshmallows in half vertically. Place three marshmallow halves stacked in a line on top of each cupcake, just above the sprinkle border, to form Olaf’s body. Attach two marshmallow bits at the base of the marshmallow stack to serve as his feet.
- Add Olaf’s Features: Use chocolate jimmies to form Olaf’s arms, hair strands, eyebrows, buttons, and eyes, breaking some jimmies into smaller pieces as needed for finer details. Place an orange jimmy shaped like a cone for his carrot-shaped nose. Cut tiny pieces from the Tootsie Roll with scissors and shape them to create Olaf’s smiling mouth. Arrange white sprinkles sporadically around Olaf on the frosting to mimic falling snow.
Notes
- Allow cupcakes to cool completely before frosting to prevent melting.
- Mini marshmallows can be halved using kitchen scissors for safer cutting.
- Feel free to use a cupcake mix or bake cupcakes from scratch according to your preference.
- Use small tweezers or a toothpick to help place small decorations precisely.
- These cupcakes are best served the same day they are decorated to keep marshmallows fresh.