
“`html
If you are looking for a show-stopping dessert that’s bursting with fun colors, creamy layers, and dreamy texture, you simply have to try this Birthday Cake Lush Cake Recipe. It feels like a party in every bite with its buttery Oreo crust, luscious cream cheese filling, fluffy cake pudding layer, and rainbow sprinkles that scream celebration. This cake isn’t just a treat—it’s an experience that wraps all the joy of birthday cake into one irresistible, chilled dessert. Once you make it, you’ll understand why it’s become a favorite for special occasions and everyday indulgence alike.
Ingredients You’ll Need
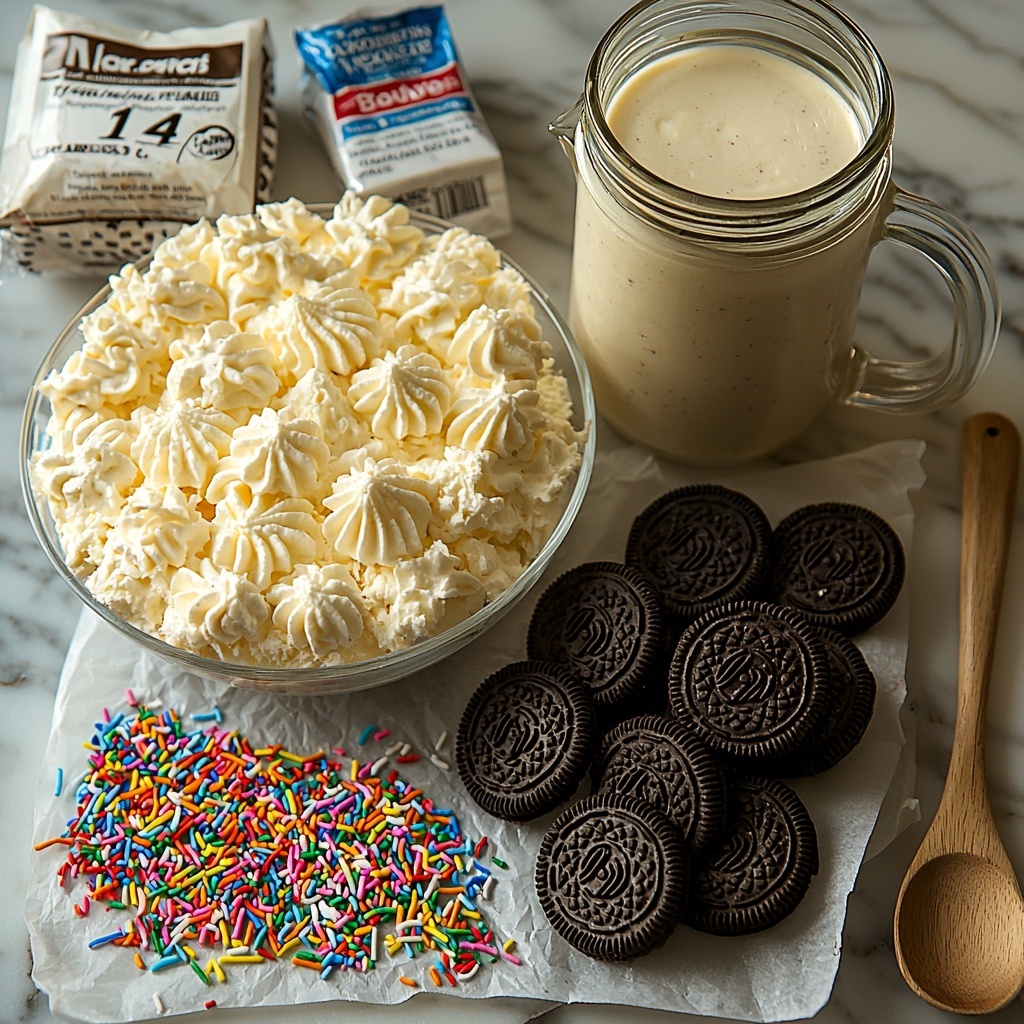
Gathering your ingredients for this Birthday Cake Lush Cake Recipe is the first step to crafting a dessert that’s as colorful as it is delicious. Each ingredient plays its part: the Oreo crust brings crunch and buttery depth, the cream cheese and whipped topping create a velvety layer, and the pudding with cake mix adds playful flavor and texture punctuated by those iconic rainbow sprinkles.
- 36 golden Oreos (finely crushed): Using golden Oreos adds a subtle vanilla touch and the perfect crunch to the crust.
- ⅓ cup melted butter: Binds the Oreo crumbs into a sturdy yet tender base that holds all the layers beautifully.
- 8 oz block of cream cheese (softened at room temperature): Ensures a smooth, rich filling that tastes indulgent without overpowering the other elements.
- 1 cup powdered sugar: Sweetens and balances the tanginess of the cream cheese for that perfect harmony.
- 16 oz frozen whipped topping, thawed, divided: Brings lightness and fluffiness, making the filling airy and luscious.
- 1 cup yellow cake mix (heat treated): A critical component that, after heat-treating, ensures the pudding layer is safe to eat and super flavorful.
- 3.4 oz package of vanilla instant pudding: Gives creamy stability and classic flavor to the cake layer.
- 1½ cups milk: Hydrates the dry ingredients and helps the pudding mix thicken perfectly.
- Rainbow sprinkles for garnishing: The fun, colorful touch that instantly elevates your dessert to party status.
How to Make Birthday Cake Lush Cake Recipe
Step 1: Prepare the Oreo Crust
Start by preheating your oven to 375 degrees and greasing a 9×13 baking dish to ensure your cake comes out perfectly without sticking. Mix the finely crushed golden Oreos with melted butter until the mixture has the texture of damp sand—this is key for a crust that’s sturdy but not dry. Press this mixture firmly and evenly into the bottom of your baking dish, making sure to cover the edges and corners fully. Bake the crust for 6 to 7 minutes, then let it cool completely before moving on to the next step.
Step 2: Make the Cream Cheese Layer
While your crust cools, use an electric mixer to beat the softened cream cheese and powdered sugar together until it’s silky smooth and fully combined—this smooths out any lumps and sets the stage for the luscious filling. Then, fold in half (8 oz) of your thawed whipped topping to lighten the mixture, creating a fluffy, creamy layer that complements the crunchy crust perfectly.
Step 3: Prepare the Cake Pudding Layer
In a separate bowl, combine your yellow cake mix, vanilla instant pudding, and milk. Beat on low to medium speed for about two minutes until the pudding thickens slightly to a custard-like texture. This step transforms dry cake mix into a dreamy, cake-flavored pudding layer that melds with the cream cheese beautifully. Don’t forget to stir in rainbow sprinkles for bursts of color throughout this layer—saving a handful for the top!
Step 4: Assemble the Layers
Once your crust is cooled, spread the cream cheese mixture evenly over it with a rubber spatula, smoothing the surface to create a clean layer. Next, pour your pudding and cake mix blend on top of the cream cheese and spread it out evenly. Finally, top everything with the remaining whipped topping, smoothing it into a perfect, flat surface that will hold your rainbow sprinkles and make your dessert look as festive as it tastes.
Step 5: Chill and Garnish
Sprinkle the reserved rainbow sprinkles generously over the whipped topping, adding that classic birthday-party flair. Refrigerate your cake for at least 4 hours or, ideally, overnight to allow all the layers to set and the flavors to meld together. When served, every forkful offers a cool, creamy, colorful bite that’s pure joy.
How to Serve Birthday Cake Lush Cake Recipe
Garnishes
Beyond the rainbow sprinkles, consider adding a few extra touches for presentation—fresh berries like raspberries or strawberries add vibrant color and a juicy contrast, while a light dusting of edible glitter or colored sugar crystals can up the festive factor. Whipped cream rosettes piped along the edges make the cake look even more luxurious and inviting.
Side Dishes
This Birthday Cake Lush Cake Recipe pairs beautifully with light, fresh sides that balance its richness. A scoop of vanilla bean ice cream or a tangy fruit salad works well to refresh the palate between bites. For celebrations, a simple sparkling lemonade or a creamy milkshake complements the sweetness without overwhelming the flavor.
Creative Ways to Present
Turn your cake into an eye-catching centerpiece by layering it in a glass trifle dish for a gorgeous layered look that showcases every colorful tier. Alternatively, use cupcake liners and assemble mini version cups from each component for individual servings that are perfect for parties and easy to grab. If you want to get creative, pipe whipped topping designs using star tips or press edible gold leaf accents for an extra touch of glamour.
Make Ahead and Storage
Storing Leftovers
This cake keeps beautifully in the refrigerator for up to 4 days. Make sure to cover it tightly with plastic wrap or an airtight lid to keep it fresh and prevent it from absorbing other flavors. The creamy layers may soften a bit over time, but the flavors only deepen and get more harmonious.
Freezing
You can freeze Birthday Cake Lush Cake Recipe for up to a month. It’s best to freeze it before adding the final whipped topping and sprinkles layer to preserve texture. Wrap the cake tightly in plastic wrap and then foil to prevent freezer burn. When ready to eat, thaw it overnight in the fridge and add fresh whipped topping and sprinkles before serving.
Reheating
This dessert is best enjoyed chilled, so reheating is not recommended, as it may cause the layers to break down or become watery. If you prefer it less cold, simply let it sit at room temperature for 10-15 minutes before serving to soften the layers slightly.
FAQs
Can I use regular Oreos instead of golden Oreos?
Yes, regular Oreos work perfectly for the crust if you prefer that classic chocolate flavor. Just keep in mind the crust will have a darker, richer taste and color compared to the lighter golden Oreos.
Why do I need to heat treat the cake mix?
Heat treating the cake mix by mixing it with milk and letting it sit ensures any potential bacteria in the dry mix are neutralized, making it safe to eat without baking. It also helps the pudding layer thicken and set properly.
Can I substitute the frozen whipped topping with fresh whipped cream?
Fresh whipped cream can work, but it tends to be less stable over long chilling times. The frozen whipped topping holds up better in this layered dessert for a consistent texture and flavor.
How long should I let this cake chill before serving?
For the best texture and flavor melding, chill the cake for at least 4 hours, though overnight is ideal. This gives the crust time to set and the layers to firm up beautifully.
Can I make this Birthday Cake Lush Cake Recipe gluten-free?
To make it gluten-free, use gluten-free yellow cake mix and gluten-free Oreos if available. Just ensure your pudding mix and other ingredients are also labeled gluten-free to avoid any surprises.
Final Thoughts
This Birthday Cake Lush Cake Recipe is truly a crowd-pleaser that brings festive joy to any occasion. Its layers of vibrant flavor and creamy texture are easy to assemble, yet they wow with every bite. Whether you’re celebrating a milestone or just want to brighten an ordinary day, this cake is going to become a treasured favorite. Go ahead and dive into this delicious project—you won’t regret making this unforgettable treat for your next gathering!
“`
Print
Birthday Cake Lush Cake Recipe
- Prep Time: 15 minutes
- Cook Time: 7 minutes
- Total Time: 4 hours 22 minutes
- Yield: 12 servings
- Category: No-Bake Dessert
- Method: Baking
- Cuisine: American
Description
This Birthday Cake Lush Cake is a delightful no-bake layered dessert featuring a buttery Oreo crust, a creamy cream cheese mixture, a colorful vanilla pudding layer mixed with rainbow sprinkles, and topped with fluffy whipped topping and more sprinkles. Perfect for celebrations, it requires chilling to set and offers a fun, festive treat that serves 12.
Ingredients
Crust
- 36 golden Oreos, finely crushed
- ⅓ cup melted butter
Cream Cheese Layer
- 8 oz block cream cheese, softened at room temperature
- 1 cup powdered sugar
- 8 oz frozen whipped topping, thawed (from 2x 8 oz containers)
Pudding Cake Layer
- 1 cup yellow cake mix (heat treated)
- 3.4 oz package vanilla instant pudding
- 1 to 1½ cups milk
- Rainbow sprinkles (approximately ¼ cup, divided)
Topping
- 8 oz frozen whipped topping, thawed (remaining from the 2 containers)
- Additional rainbow sprinkles for garnishing
Instructions
- Prepare the oven and baking dish: Preheat your oven to 375°F (190°C). Spray a 9×13-inch baking dish with non-stick cooking spray to prevent sticking.
- Make the crust: In a small bowl, mix the finely crushed golden Oreos with melted butter until the mixture resembles wet sand. Press this crumb mixture firmly and evenly into the bottom and edges of the prepared baking dish to form the crust.
- Bake the crust: Place the baking dish in the oven and bake the crust for 6-7 minutes. Once done, remove and allow it to cool completely before assembling the cake.
- Prepare the cream cheese layer: Using an electric mixer, beat the softened cream cheese and powdered sugar together for 1-2 minutes until smooth and fully combined. Add 8 oz of the thawed whipped topping to the cream cheese mixture and mix until well incorporated. Set aside.
- Prepare the pudding cake layer: In a separate bowl, combine the heat-treated yellow cake mix, vanilla instant pudding, and 1 to 1½ cups of milk. Mix on low to medium speed for about 2 minutes, until the pudding thickens slightly.
- Add sprinkles to pudding layer: Fold in rainbow sprinkles into the pudding mixture, reserving a small handful for garnish on top of the cake. Mix until the sprinkles are evenly distributed.
- Assemble the cake – cream cheese layer: Spread the cream cheese mixture evenly over the cooled Oreo crust using a rubber spatula.
- Assemble the cake – pudding layer: Carefully spread the pudding cake mixture evenly over the cream cheese layer.
- Top with whipped topping: Spread the remaining 8 oz of whipped topping evenly over the pudding layer to create a smooth, flat surface.
- Decorate and chill: Sprinkle the reserved rainbow sprinkles over the top for garnish. Cover and refrigerate the cake for at least 4 hours or preferably overnight to allow it to set properly before serving.
Notes
- Heat treating the yellow cake mix prevents any raw flour taste and ensures safety by removing bacteria.
- Make sure the Oreo crust is completely cooled before adding the cream cheese layer to prevent melting.
- You can use regular Oreos if golden Oreos are not available; this will change the flavor slightly.
- This dessert is best served chilled and within 2-3 days for optimal freshness.
- Allow the cream cheese to soften at room temperature to avoid lumps in the mixture.


