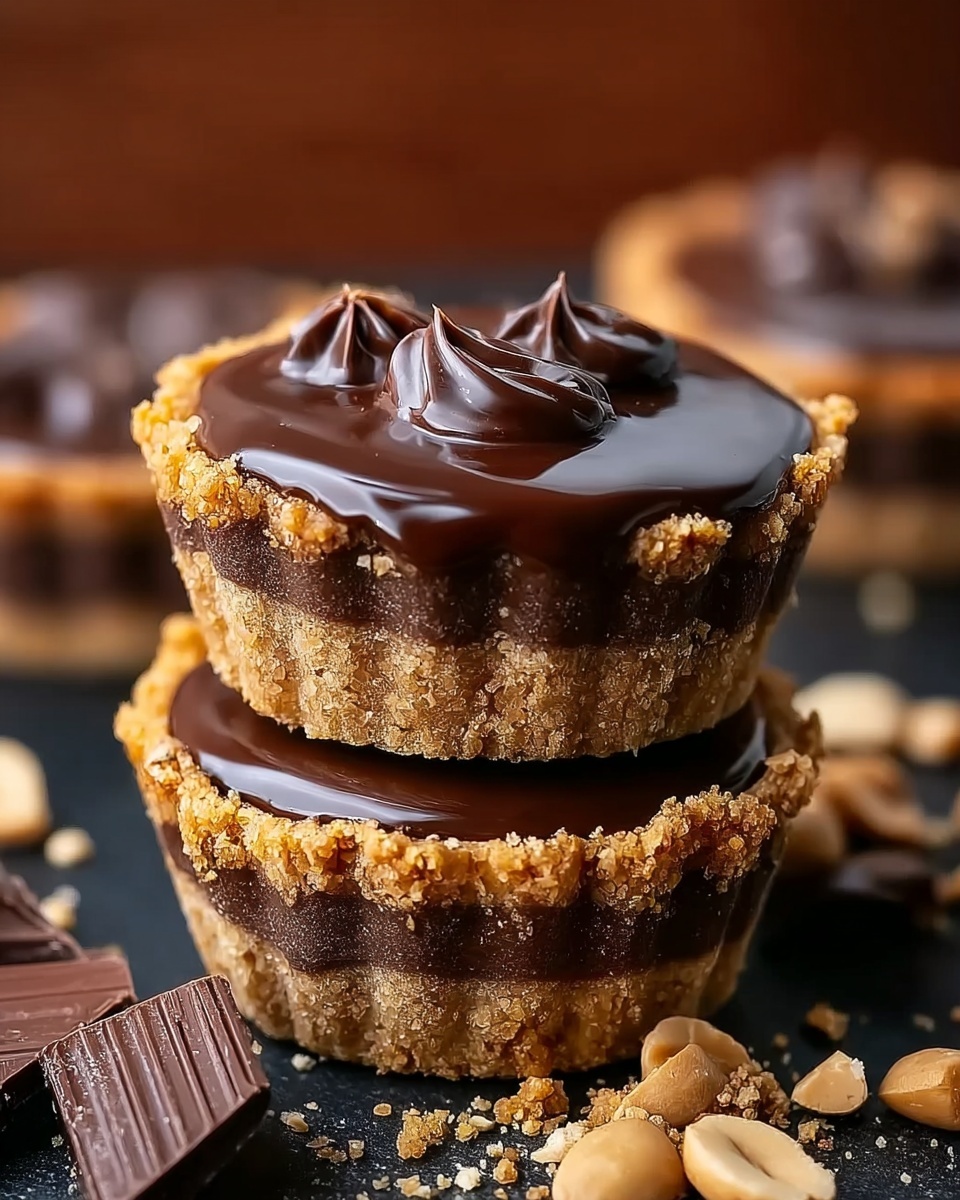
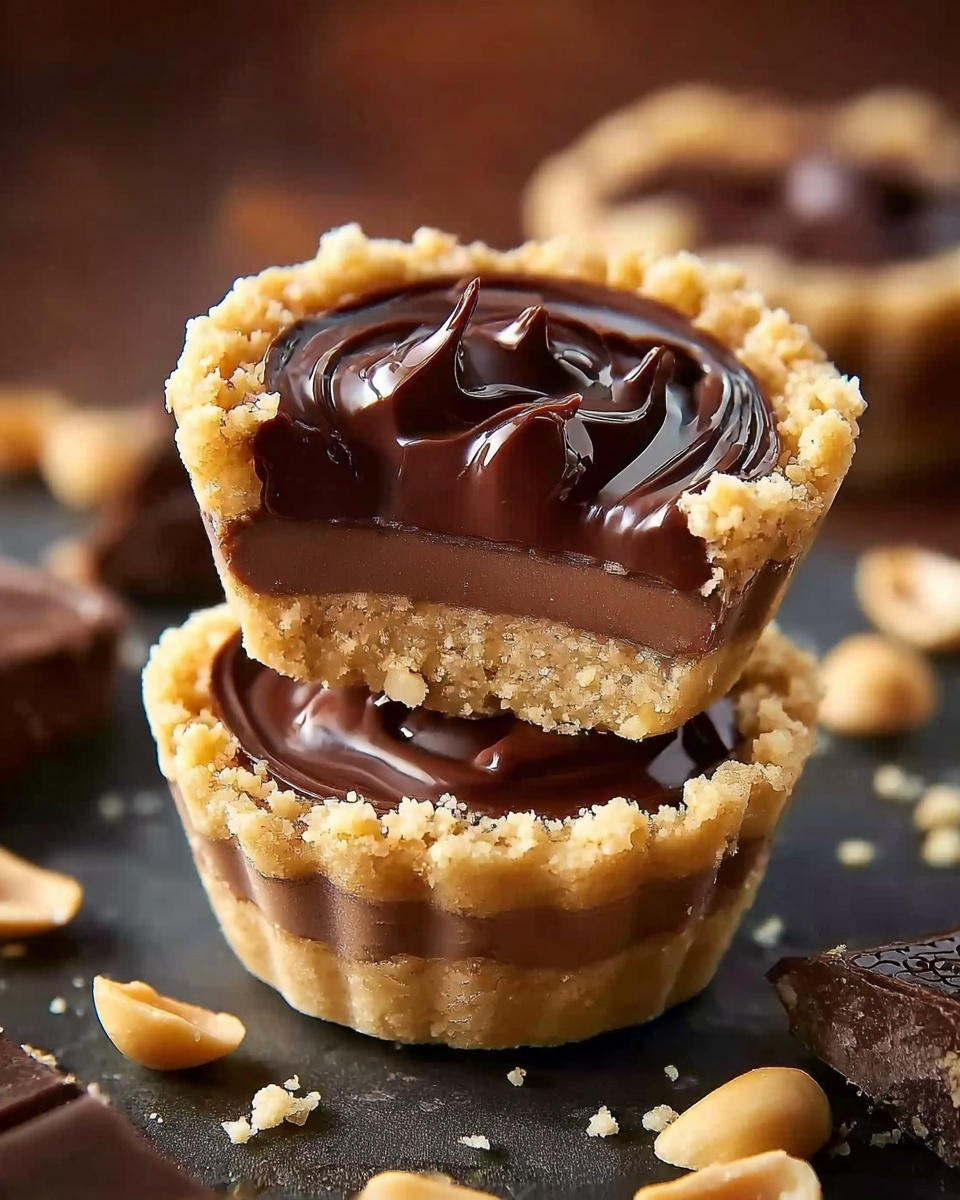
Get ready to delight your taste buds with the Decadent Mini Chocolate Peanut Butter Pies Recipe, a sweet little treasure that’s bursting with rich peanut butter creaminess and smooth chocolate ganache atop a perfectly crunchy crust. Each bite delivers a heavenly balance between silky textures and bold flavors, making these mini pies the ultimate treat for any occasion. Whether you’re craving a quick indulgence or planning a dessert spread, these pies embody everything wonderful about combining chocolate and peanut butter in a fun, bite-sized form.
Ingredients You’ll Need
Ingredients You’ll Need
These simple yet essential ingredients work in harmony to create the perfect texture, taste, and look of your mini pies. Each adds an important element, from the buttery crust to the luscious filling and glossy ganache, helping you achieve dessert perfection.
- Chocolate graham crackers or Oreos (1 ½ cups, crushed): Provide a deep chocolate base with a satisfying crunch and a bit of sweetness.
- Unsalted butter (¼ cup, melted): Binds the crust ingredients and adds richness.
- Cream cheese (8 oz, softened): Brings a creamy tang that balances the sweetness and peanut butter.
- Creamy peanut butter (¾ cup): The star flavor, delivering smooth, nutty goodness.
- Powdered sugar (¾ cup): Sweetens the filling smoothly without graininess.
- Vanilla extract (1 teaspoon): Enhances all the flavors with a warm, aromatic lift.
- Heavy whipping cream (1 cup, cold for filling; ½ cup for ganache): Whipped to airy peaks for lightness in the filling and heated for a shiny ganache topping.
- Semi-sweet chocolate chips (¾ cup): Melt into the ganache, balancing the peanut butter with bittersweet notes.
- Unsalted butter (1 tablespoon for ganache): Adds a subtle silkiness and shine to the chocolate topping.
- Optional toppings: Whipped cream, chopped peanuts, mini chocolate chips, or peanut butter drizzle for extra indulgence and texture.
How to Make Decadent Mini Chocolate Peanut Butter Pies Recipe
Step 1: Prepare the Crust
Start by preheating your oven to 350°F (175°C). While it heats, combine the crushed chocolate graham crackers or Oreos with melted butter in a bowl, mixing until every crumb is coated. This mixture will form a firm and delicious crust that holds together perfectly in each mini pie.
Step 2: Bake the Crusts
Press about 1 to 2 tablespoons of the crust mixture firmly into each muffin liner or mini tart pan. This step ensures a compact base that remains crunchy after baking. Bake these for a quick 5 to 6 minutes, then let them cool completely before adding the filling. Cooling prevents the filling from melting and keeps your pies looking neat.
Step 3: Make the Peanut Butter Filling
In a mixing bowl, beat the softened cream cheese with creamy peanut butter until perfectly smooth and blended. Adding powdered sugar and vanilla extract at this stage makes the filling irresistibly sweet and aromatic. In another bowl, whip the cold heavy cream to stiff peaks—this aerates the filling, making it light and fluffy when folded in gently.
Step 4: Assemble the Filling
Carefully fold the whipped cream into the peanut butter mixture until the texture is uniformly airy and luscious. Spoon or pipe this heavenly filling over the cooled crusts, smoothing the tops for a polished look. Chill these in the fridge for at least 2 hours to let the filling set and flavors meld beautifully.
Step 5: Make the Chocolate Ganache
Warm the half cup of heavy cream until steaming hot, then pour it over the semi-sweet chocolate chips in a bowl. Add butter and let the mixture sit for a minute so the chocolate melts. Whisk everything together until your ganache is glossy and smooth, then cool slightly before spooning it carefully over each chilled peanut butter filling layer.
Step 6: Final Touches
Top each pie with your choice of whipped cream, chopped peanuts, mini chocolate chips, or even a peanut butter drizzle to add texture and visual appeal. These finishing touches not only enhance flavor but make your mini pies look like edible works of art. Store them refrigerated until you’re ready to serve, ensuring every bite is cool and decadent.
How to Serve Decadent Mini Chocolate Peanut Butter Pies Recipe
Garnishes
Whipped cream and crushed peanuts make classic garnishes that complement the rich filling flawlessly. Mini chocolate chips add a hint of extra chocolate crunch, while a drizzle of peanut butter can elevate the visual wow factor. These simple additions turn your mini pies into Instagram-worthy treats and make every mouthful more satisfying.
Side Dishes
Pair these mini pies with fresh berries or a dollop of vanilla ice cream to introduce a fresh brightness that cuts through the richness. A cold glass of milk is always a nostalgic and perfect match, balancing out the decadent flavors with its creamy simplicity.
Creative Ways to Present
Serve your Decadent Mini Chocolate Peanut Butter Pies Recipe on a charming platter with colorful napkins for a party vibe or place each pie in a decorative cupcake liner for an elegant touch. You can also arrange them alongside coffee or dessert wines for a grown-up twist that will impress your guests effortlessly.
Make Ahead and Storage
Storing Leftovers
Keep any leftover mini pies in an airtight container in the refrigerator. They hold up well for up to three days, maintaining their creamy texture and crisp crust. This means you can make these ahead of time and still serve fresh desserts.
Freezing
If you want to keep these treats longer, freeze them in a single layer on a baking sheet first, then transfer to a freezer-safe container. They freeze beautifully for up to a month. Thaw in the refrigerator overnight before serving for best results.
Reheating
These pies are best enjoyed chilled, so reheating is not recommended. Instead, allow them to sit at room temperature for about 10 minutes if they are too firm from the refrigerator, which helps soften the ganache slightly without losing the fresh texture of the filling.
FAQs
Can I use crunchy peanut butter instead of creamy?
Absolutely! Using crunchy peanut butter will add an extra layer of texture inside the smooth filling, which some may find delightful. Just blend it well with the cream cheese to keep the mixture even.
Do I have to bake the crust?
Baking the crust helps it set firmly and brings out the buttery flavor, but if you’re short on time, chilling the crust thoroughly can also work. Keep in mind it may be a bit softer, but still delicious.
Can I make these pies gluten-free?
Yes, simply substitute the chocolate graham crackers or Oreos with a gluten-free cookie alternative. Many gluten-free chocolate cookies are available and will work great for the crust.
How long does the ganache need to cool before pouring?
Let the ganache cool just until it thickens slightly but is still pourable. This usually takes about 5 to 10 minutes after whisking. If the ganache is too hot, it can melt the filling; too cool, and it will be difficult to spread.
Can I double the recipe?
Definitely! This recipe scales up well, so just double the ingredients and use two muffin pans or tart pans. Just make sure to adjust chilling times if needed to ensure everything sets properly.
Final Thoughts
Now that you have this gorgeous Decadent Mini Chocolate Peanut Butter Pies Recipe in your culinary toolkit, I can’t wait for you to enjoy making and sharing it with friends and family. It’s a stunning dessert that feels luxurious yet is surprisingly simple to prepare. Whether for a special occasion or a cozy night in, these mini pies are guaranteed to bring smiles and happy sighs at the dessert table.
Print
Decadent Mini Chocolate Peanut Butter Pies Recipe
- Prep Time: 25 minutes
- Cook Time: 3 hours (includes chilling time)
- Total Time: 3 hours 25 minutes
- Yield: 12 mini pies
- Category: Dessert
- Method: Baking
- Cuisine: American
Description
These Decadent Mini Chocolate Peanut Butter Pies are a luscious blend of creamy peanut butter filling nestled in crisp chocolate graham cracker crusts, topped with a smooth chocolate ganache. Perfectly portioned as bite-sized treats, they are chilled to set for a rich, indulgent dessert that combines creamy, crunchy, and chocolaty textures in every mini pie.
Ingredients
For the Crust:
- 1 ½ cups (150g) crushed chocolate graham crackers or Oreos
- ¼ cup (56g) unsalted butter, melted
For the Peanut Butter Filling:
- 8 oz (226g) cream cheese, softened
- ¾ cup (190g) creamy peanut butter
- ¾ cup (90g) powdered sugar
- 1 teaspoon vanilla extract
- 1 cup (240ml) heavy whipping cream, cold
For the Chocolate Ganache:
- ¾ cup (130g) semi-sweet chocolate chips
- ½ cup (120ml) heavy cream
- 1 tablespoon unsalted butter
Optional Toppings:
- Whipped cream
- Chopped peanuts
- Mini chocolate chips
- Peanut butter drizzle
Instructions
- Preheat Oven: Preheat your oven to 350°F (175°C) to prepare for baking the crust.
- Make the Crust Mixture: In a bowl, combine the crushed chocolate graham crackers or Oreos with the melted unsalted butter until the crumbs are evenly coated and mixture resembles wet sand.
- Form Mini Crusts: Divide about 1 to 2 tablespoons of the crust mixture into each muffin liner or mini tart pan, pressing firmly to create an even, compact base for the pies.
- Bake Crusts: Bake the crusts for 5 to 6 minutes until set. Remove from oven and allow them to cool completely to ensure they firm up properly.
- Prepare Peanut Butter Filling – Mix Cream Cheese and Peanut Butter: In a mixing bowl, beat the softened cream cheese and creamy peanut butter together until the texture is smooth and well combined.
- Add Powdered Sugar and Vanilla: Incorporate the powdered sugar and vanilla extract into the cream cheese and peanut butter mixture, beating until the mixture is creamy and homogenous.
- Whip Heavy Cream: In a separate bowl, whip the cold heavy whipping cream until stiff peaks form, creating a light and airy texture.
- Fold Whipped Cream into Peanut Butter Mixture: Gently fold the whipped cream into the peanut butter mixture, careful not to deflate it, until the filling is fluffy and smooth.
- Fill the Crusts: Spoon or pipe the peanut butter filling over the cooled crusts, smoothing the tops evenly.
- Chill the Pies: Place the mini pies in the refrigerator and chill for at least 2 hours to allow the filling to set properly.
- Heat Heavy Cream for Ganache: Heat the heavy cream until steaming using either a microwave or stovetop method.
- Make Chocolate Ganache: Pour the hot cream over the semi-sweet chocolate chips, add the unsalted butter, and let the mixture sit for 1 minute.
- Whisk Ganache Smooth: Whisk the cream and chocolate mixture thoroughly until smooth and glossy.
- Top Filling with Ganache: Allow the ganache to cool slightly, then spoon it over the chilled peanut butter filling in each mini pie.
- Add Toppings: Garnish with optional toppings like whipped cream, chopped peanuts, mini chocolate chips, or a drizzle of peanut butter as desired.
- Refrigerate Until Serving: Keep the pies refrigerated until ready to serve to maintain their structure and freshness.
Notes
- Use chocolate graham crackers or Oreos depending on your preferred chocolate intensity in the crust.
- Ensure the cream cheese is fully softened for smooth mixing.
- Whip the heavy cream to stiff peaks for the best texture in the filling.
- Chilling the pies for at least 2 hours is essential for the filling to set properly.
- The ganache should be warm but not hot when poured to avoid melting the filling.
- For a crunchy texture, add chopped peanuts as topping just before serving.
- These mini pies can be stored in the refrigerator for up to 3 days.


