
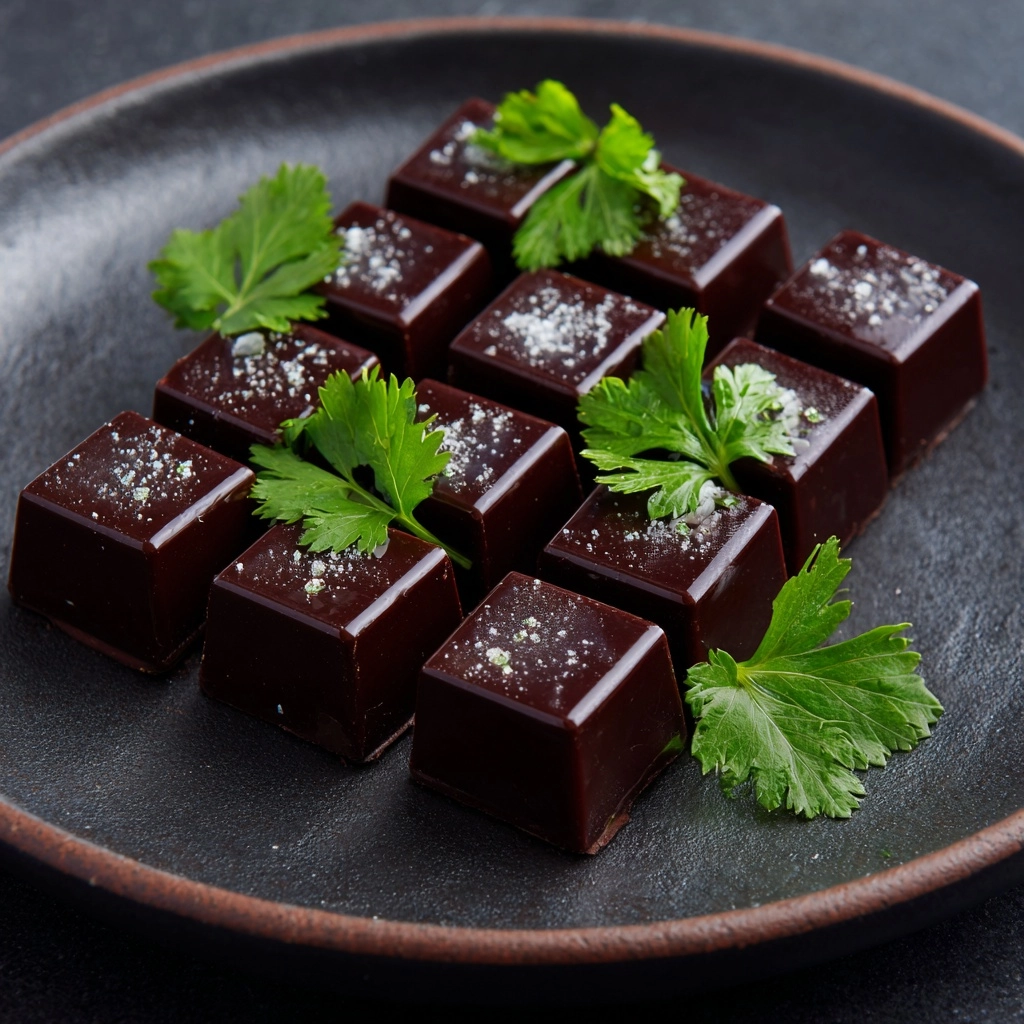
If you’ve ever craved that perfectly rich and luxurious treat at home, look no further than Homemade Dark Chocolate. This easy recipe brings together pure, natural ingredients for a velvety-smooth bar or bite that chocolate lovers dream about. With the deep cocoa flavor you love, natural sweetness, and a hint of coconut, every bite feels like a celebration—plus, it’s deliciously vegan, gluten-free, and totally customizable!
Ingredients You’ll Need
The magic of Homemade Dark Chocolate lies in its simplicity. Every ingredient is there for a reason, working together to create that signature snap, melt-in-your-mouth texture, and luscious flavor you can’t resist. Here’s what you’ll need—and why each one matters.
- Cocoa Powder (unsweetened): The heart of the chocolate, delivering bold, deep flavor and that iconic dark color—choose a high-quality powder for the best results!
- Coconut Oil (melted): This is your natural “glue,” giving the chocolate its silky texture and beautiful sheen, plus a subtle coconut undertone.
- Maple Syrup or Honey: Sweetens the deal naturally, with just-right richness—plus, it helps keep things soft and creamy.
- Vanilla Extract: Rounds out all the flavors, adding warm, aromatic notes that balance the intensity of the cocoa.
- Pinch of Sea Salt: Just a pinch wakes up the chocolate, enhancing the flavors and giving every bite a little extra dimension.
How to Make Homemade Dark Chocolate
Step 1: Blend the Base
Begin by adding your melted coconut oil to a mixing bowl. Sprinkle in the cocoa powder and whisk vigorously until completely combined and lump-free. This step sets the foundation for smooth, glossy Homemade Dark Chocolate, so keep whisking until you see a rich, shiny mixture start to form.
Step 2: Sweeten and Flavor
Pour in the maple syrup (or honey) and vanilla extract, whisking as you go. The mixture will noticeably thicken and develop an irresistible aroma. Add a pinch of sea salt and give everything one last thorough whisk. Go ahead and taste—it’s the perfect chance to dial in your preferred level of sweetness for your Homemade Dark Chocolate.
Step 3: Mold the Chocolate
Next, choose your vessel: silicone molds, mini cupcake liners, or a parchment-lined loaf pan all work beautifully. Pour the chocolate mixture in, spreading evenly. To avoid air bubbles, gently tap the molds or pan against your countertop—this simple trick ensures a smooth finish and perfect texture for your Homemade Dark Chocolate creations.
Step 4: Chill Until Set
Now, patience! Pop the filled molds into your refrigerator or freezer. In just 20 to 30 minutes, your chocolate will firm up and become glossy and snappable. When fully set, remove them from the molds, marvel at the shine, and try not to eat them all at once.
How to Serve Homemade Dark Chocolate

Garnishes
There’s endless fun in dressing up Homemade Dark Chocolate! Before chilling, sprinkle with flaky sea salt, chopped pistachios, toasted coconut, or a scattering of cacao nibs. These add pops of flavor, texture, and a gourmet visual flair.
Side Dishes
Homemade Dark Chocolate is a treat on its own, but it pairs wonderfully with fresh berries, sliced oranges, or a cozy mug of coffee or tea. A scoop of dairy-free vanilla ice cream alongside makes for an irresistible, restaurant-worthy dessert at home!
Creative Ways to Present
Try pouring the chocolate into whimsical silicone molds for cute shapes, or stack pieces inside mini mason jars tied with ribbon for homemade gifts. For a dramatic twist, create a chocolate “bark” by spreading in a pan, swirling with peanut butter, and breaking into rustic shards. Every serving style highlights your Homemade Dark Chocolate personality!
Make Ahead and Storage
Storing Leftovers
Keep your extra Homemade Dark Chocolate in an airtight container nestled in the refrigerator. This not only preserves its snappy texture but also keeps the coconut oil solid, so every piece stays perfectly tempered until you’re ready for a treat.
Freezing
If you want to make a big batch for later, freezing is a fantastic option. Layer pieces of chocolate between parchment paper and pop them in a sealed container or freezer bag. When the craving strikes, just let them come to room temperature for a few minutes before munching.
Reheating
Unlike many desserts, Homemade Dark Chocolate doesn’t need reheating—it’s best enjoyed straight from the fridge or freezer! If you’re using the chocolate in a sauce or to dip fruit, gently melt a portion in a double boiler or microwave in short bursts, stirring frequently for a smooth, pourable treat.
FAQs
Can I use a different oil instead of coconut oil?
While coconut oil is unique for its texture and subtle flavor, you could try refined coconut oil for less coconut taste, or experiment with cocoa butter for a richer, more traditional chocolate experience. Avoid liquid oils, though, as they don’t set up as firmly.
Is Homemade Dark Chocolate really vegan?
Absolutely—as long as you use maple syrup (or a vegan-friendly sweetener) instead of honey, this recipe is 100% vegan, dairy-free, and plant-powered, so everyone can indulge without worry!
How do I make it sweeter or less bitter?
Easy fix! Just taste your mixture before pouring into molds and add more maple syrup or honey a teaspoon at a time until it’s just right for your palate. Keep in mind the flavor will intensify as it chills.
What if I don’t have silicone molds?
No problem at all. Line a loaf pan or any small baking dish with parchment paper, pour the chocolate in, and once set, cut or break it into rustic chunks or shards—your Homemade Dark Chocolate will be just as delicious!
Can I add other mix-ins?
Definitely! Chopped nuts, dried fruit, chili flakes, orange zest, or even espresso powder can all be stirred in before chilling, giving your Homemade Dark Chocolate a personal twist every time.
Final Thoughts
If you’ve never made Homemade Dark Chocolate before, dive in now—you’ll be delighted at how easy and satisfying it is. With just a handful of ingredients and lots of ways to customize, this could become your new go-to treat for every chocolate craving. Grab a bowl and let the chocolate magic begin!
Print
Homemade Dark Chocolate Recipe
- Prep Time: 10 minutes
- Cook Time: 0 minutes
- Total Time: 10 minutes (plus chilling)
- Yield: 8 small pieces
- Category: Dessert
- Method: No-Cook
- Cuisine: American
- Diet: Vegan
Description
Indulge in the rich, decadent flavor of homemade dark chocolate with this easy recipe. Made with simple ingredients, this vegan and gluten-free treat is perfect for satisfying your sweet tooth without any guilt.
Ingredients
Main Ingredients:
- 1/2 cup cocoa powder (unsweetened)
- 1/4 cup coconut oil (melted)
- 3 tablespoons maple syrup or honey
- 1/2 teaspoon vanilla extract
- pinch of sea salt
Instructions
- Mix Ingredients: In a medium bowl, whisk together melted coconut oil, cocoa powder, maple syrup (or honey), vanilla extract, and sea salt until smooth.
- Adjust Sweetness: Taste and adjust sweetness if needed.
- Pour and Set: Pour the mixture into molds, tap to remove air bubbles, then chill in the refrigerator or freezer until set.
- Store: Once hardened, remove from molds and store in an airtight container in the refrigerator.
Notes
- For added texture, consider mixing in chopped nuts, shredded coconut, or cacao nibs before chilling.
- Use food-grade silicone molds for easy release and fun shapes.
- Store in a cool place as coconut oil melts at warm temperatures.
Nutrition
- Serving Size: 1 piece
- Calories: 110
- Sugar: 5g
- Sodium: 10mg
- Fat: 10g
- Saturated Fat: 8g
- Unsaturated Fat: 2g
- Trans Fat: 0g
- Carbohydrates: 7g
- Fiber: 2g
- Protein: 1g
- Cholesterol: 0mg
