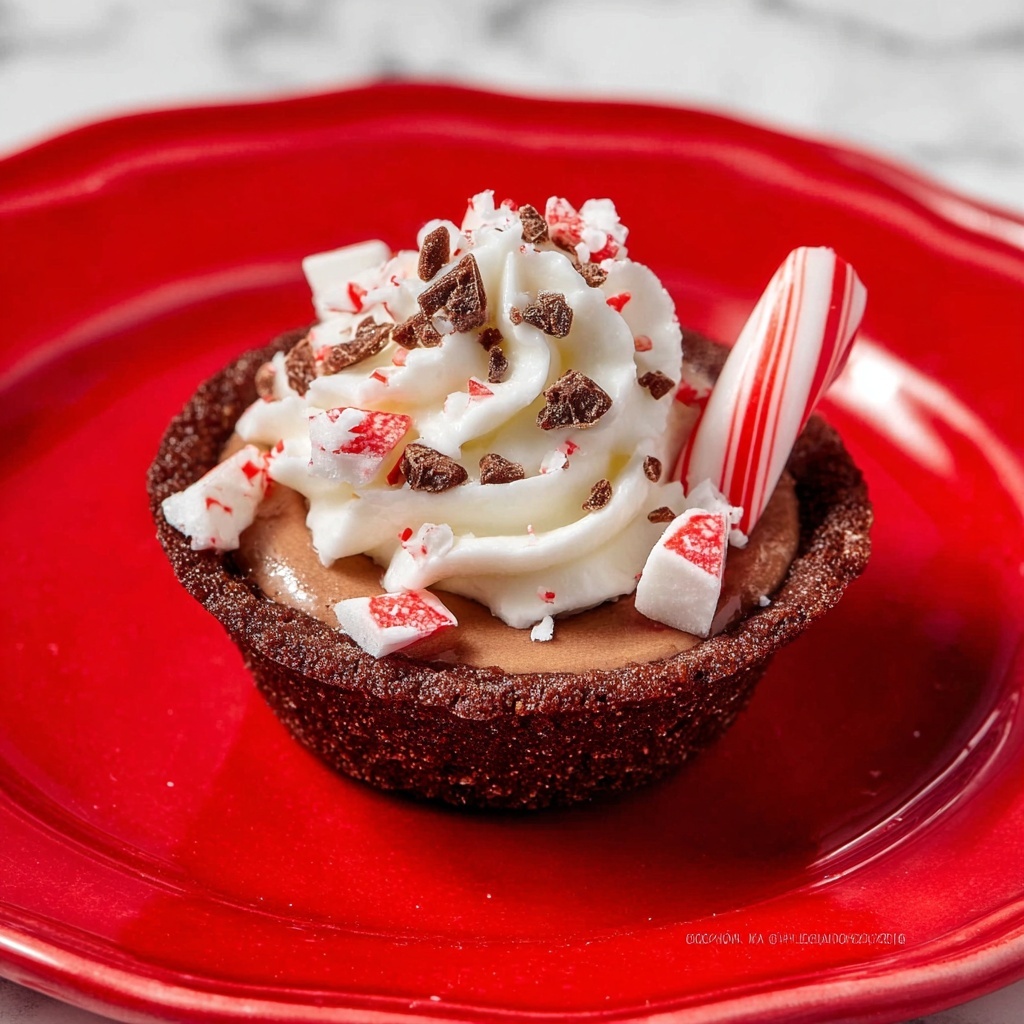
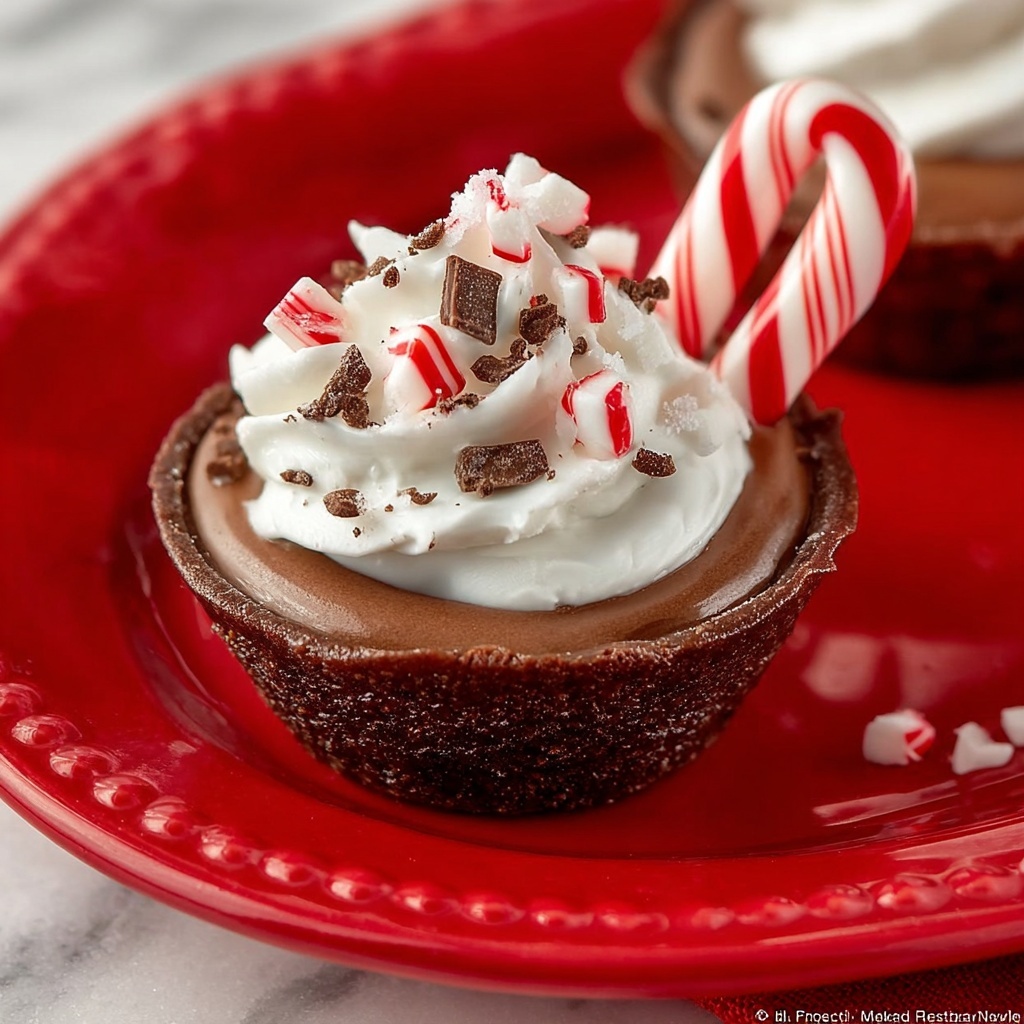
If you’re looking for a little bite-sized indulgence that feels like a hug in dessert form, the Hot Chocolate Brownie Bites Recipe is absolute magic. These delightful mini brownies are rich, fudgy, and topped with a swirl of creamy, stabilized white chocolate whipped cream that tastes just like a warm cup of hot chocolate in dessert form. The crown jewel? A milk chocolate kiss melting right atop while the brownies are still warm, plus playful garnishes like peppermint sticks and mini marshmallows that transport your taste buds straight to cozy winter moments. Whether you’re serving them at a party or craving a personal treat, these bites are quick to make yet impressively decadent and comforting.
Ingredients You’ll Need
Gathering your ingredients for this Hot Chocolate Brownie Bites Recipe is wonderfully simple, and each one plays a key role in creating that perfect balance of texture, flavor, and festive charm. From the chocolatey brownie base to the luscious whipped topping and fun peppermint accents, you’ll want to keep these essentials on hand for a truly delightful treat.
- Brownie mix package with required ingredients (oil, eggs, water): A quick shortcut that ensures fudgy and moist brownie bites every time.
- 24 chocolate kisses: These melt beautifully into the warm brownies, adding a creamy chocolate layer.
- 2 cups heavy cream: The backbone of the stabilized whipped cream for a rich and fluffy topping.
- 2 tablespoons powdered sugar: Sweetens the whipped cream smoothly without graininess.
- 2 tablespoons instant white chocolate pudding mix: This addition stabilizes the whipped cream and gives it a luscious white chocolate flavor.
- Peppermint sticks: Adds a refreshing, festive crunch and a pop of color.
- Mini marshmallows: Classic hot chocolate vibes right on top of each bite.
- Chocolate sauce (optional): A drizzle for extra chocolatey decadence and visual appeal.
How to Make Hot Chocolate Brownie Bites Recipe
Step 1: Preheat and Prepare the Pan
Start by preheating your oven to 350 degrees Fahrenheit. Spraying a 24-mini muffin pan with a baking spray that includes flour is key here—it helps those brownie bites release perfectly without sticking.
Step 2: Mix the Brownie Batter
Follow the instructions on your brownie mix package carefully. The simplicity of a mix lets you focus on turning these brownie bites into hot chocolate heaven without fuss.
Step 3: Fill and Bake
Fill each mini muffin cup about two-thirds full with the brownie batter. This ensures there is room for the chocolate kiss and whipped cream topping later. Bake them for 7 to 10 minutes until the edges are set but the centers still hold a bit of softness—this fudgy texture is what makes each bite so irresistible.
Step 4: Add the Chocolate Kisses
As soon as they come out of the oven, gently press one chocolate kiss into each brownie bite with the pointed end down and flat side up. The residual heat will soften the chocolates, and if you want, you can use a spatula to spread the melted chocolate into a smooth layer for that “cocoa” effect.
Step 5: Cool the Brownie Bites
Transfer your brownie bites to a cooling rack and let them cool completely. This step is important before moving onto the whipped cream topping so nothing melts away or runs off.
Step 6: Make the Stabilized Whipped Cream
Using a very cold bowl and mixer, beat the heavy cream at high speed until it starts thickening. Add powdered sugar and continue until soft peaks form. Then incorporate the instant white chocolate pudding mix and beat just until stiff peaks appear. Watch closely to avoid overmixing—you want that fluffy, stable cream that holds up beautifully on your brownie bites.
Step 7: Pipe the Topping and Garnish
Once the brownies are fully cooled, use a piping bag or spoon to carefully top each one with the stabilized whipped cream. Then get creative with your garnishes — sprinkle on mini marshmallows, crushed peppermint sticks, a drizzle of chocolate sauce, or any festive touches you love.
How to Serve Hot Chocolate Brownie Bites Recipe

Garnishes
The magic of this Hot Chocolate Brownie Bites Recipe is in the finishing touches. Mini marshmallows add playful texture and that classic hot chocolate feel, while peppermint sticks introduce a fresh and colorful crunch. A drizzle of chocolate sauce brings rich decadence and makes every bite look irresistible.
Side Dishes
Serve these brownie bites alongside a cup of warm coffee, a mug of actual hot chocolate, or a tall glass of milk to create a wonderfully balanced dessert experience. They also shine on a party platter with other festive treats, bringing a mix of textures and tastes everyone will adore.
Creative Ways to Present
Arrange your Hot Chocolate Brownie Bites Recipe on a festive tray lined with parchment paper or a rustic wooden board for charming presentation. Use small cupcake liners in holiday colors to add a pop of fun. Adding edible glitter or colorful sprinkles can also make these mini delights extra special for celebrations.
Make Ahead and Storage
Storing Leftovers
Keep any leftover brownie bites stored in an airtight container in the refrigerator to maintain freshness. They’ll stay tasty for up to 3 days, though honestly, they rarely last that long because they’re so delicious.
Freezing
If you want to prepare in advance, freeze the un-topped brownie bites by placing them in a single layer on a baking sheet first, then transfer to a freezer-safe container. When ready, thaw completely before adding the whipped cream topping and garnishes for best results.
Reheating
Warm frozen or refrigerated brownie bites gently in a microwave for a few seconds if desired, but be careful not to melt the chocolate kisses too much or the whipped cream topping. It’s best to add fresh toppings after reheating to preserve texture and taste.
FAQs
Can I use homemade brownie batter instead of a mix?
Absolutely! A homemade brownie batter will work beautifully with this Hot Chocolate Brownie Bites Recipe and give you full control over sweetness and texture.
What if I don’t have instant white chocolate pudding mix?
You can skip the pudding mix, but the whipped cream might be less stable and melt faster. Alternatively, try adding a small amount of cream cheese or gelatin for stabilization.
Can I make these vegan or dairy-free?
With some swaps like vegan brownie mix, dairy-free chocolate kisses, and coconut cream in place of heavy cream, you can definitely adapt the recipe to be vegan-friendly.
How long does the stabilized whipped cream hold up?
When made properly, the whipped cream topping stays fluffy and stable for several hours at room temperature and even longer if refrigerated.
Can I add other flavors to the whipped cream?
Yes! Try adding a splash of peppermint extract, vanilla, or even a touch of espresso powder to the whipped cream for personalized flavor twists that complement the brownies.
Final Thoughts
If you’re eager to impress your friends or treat yourself with something that feels both indulgent and cozy, don’t wait to try the Hot Chocolate Brownie Bites Recipe. It’s a super fun, easy, and utterly scrumptious way to enjoy the flavors of hot chocolate in a portable, party-ready form. Happy baking and even happier eating!
Print
Hot Chocolate Brownie Bites Recipe
- Prep Time: 15 minutes
- Cook Time: 10 minutes
- Total Time: 25 minutes
- Yield: 24 mini brownie bites
- Category: Dessert
- Method: Baking
- Cuisine: American
Description
Delight in these Hot Chocolate Brownie Bites featuring rich brownie cups topped with melting chocolate kisses and fluffy stabilized white chocolate whipped cream, garnished with festive peppermint sticks, mini marshmallows, and chocolate sauce. Perfect for cozy gatherings or holiday treats, these mini desserts combine the warmth of hot cocoa flavors in a fun and bite-sized form.
Ingredients
Brownie Cups
- 1 package brownie mix for a 9×9 pan plus required ingredients (oil, eggs, water) as per box instructions
- 24 chocolate kisses
Stabilized Whipped Cream
- 2 cups heavy cream, very cold
- 2 tablespoons powdered sugar
- 2 tablespoons instant white chocolate pudding mix
Garnishes
- Peppermint sticks, chopped
- Mini marshmallows
- Chocolate sauce
Instructions
- Preheat Oven: Set your oven to 350°F (175°C) to prepare for baking the brownie bites.
- Prepare Muffin Pan: Spray a 24 mini muffin pan thoroughly with a baking spray that includes flour to prevent sticking.
- Mix Brownies: Follow the brownie mix package instructions by combining the brownie mix with the required oil, eggs, and water.
- Fill Muffin Cups: Spoon the brownie batter into the mini muffin cups filling each about two-thirds full to allow room for rising.
- Bake: Bake in the preheated oven for 7-10 minutes, until the edges are set but the centers remain soft and not fully solidified.
- Add Chocolate Kisses: Immediately after removing from the oven, press one chocolate kiss into each brownie cup with the pointed side down and flat top up. Let them soften; optionally smooth the melted chocolate with a spatula to resemble hot cocoa.
- Cool Brownies: Allow the brownie bites to cool completely in the muffin pan, then transfer them to a cooling rack to set fully.
- Prepare Stabilized Whipped Cream: In a chilled bowl, whip the cold heavy cream at high speed until it starts to thicken.
- Add Sugar: Add powdered sugar and continue whipping until soft peaks form, indicating medium firmness.
- Add Pudding Mix: Mix in the instant white chocolate pudding mix and whip until stiff peaks form, being careful not to overbeat to avoid curdling.
- Pipe Whipped Cream: Once brownies are fully cooled, use a piping bag or spoon to top each brownie bite with the stabilized whipped cream.
- Garnish: Decorate with mini marshmallows, chopped peppermint sticks, sprinkles, and drizzle with chocolate sauce as desired for a festive finish.
Notes
- Using a baking spray with flour helps the brownies release cleanly from the mini muffin pan.
- Do not overbake the brownies; the center should remain soft for the best texture.
- Whipping cream and bowl should be very cold to achieve stable peaks efficiently.
- Stabilized whipped cream keeps its form longer, ideal for decorating and making ahead.
- Garnishes can be customized based on preference or seasonal themes.


