
If you’ve been craving a dish that perfectly blends crispy texture with juicy tenderness, you’re in for a treat. This Irresistibly Juicy Fried Chicken Katsu with Panko at Home Recipe gives you that golden, crunchy exterior and a mouthwatering, succulent inside every single time. It’s fuss-free, deeply satisfying, and just the kind of comfort food that feels like a warm hug from a best friend. Once you master this recipe, fried chicken katsu won’t just be a takeout wish—it will be your go-to homemade delight!
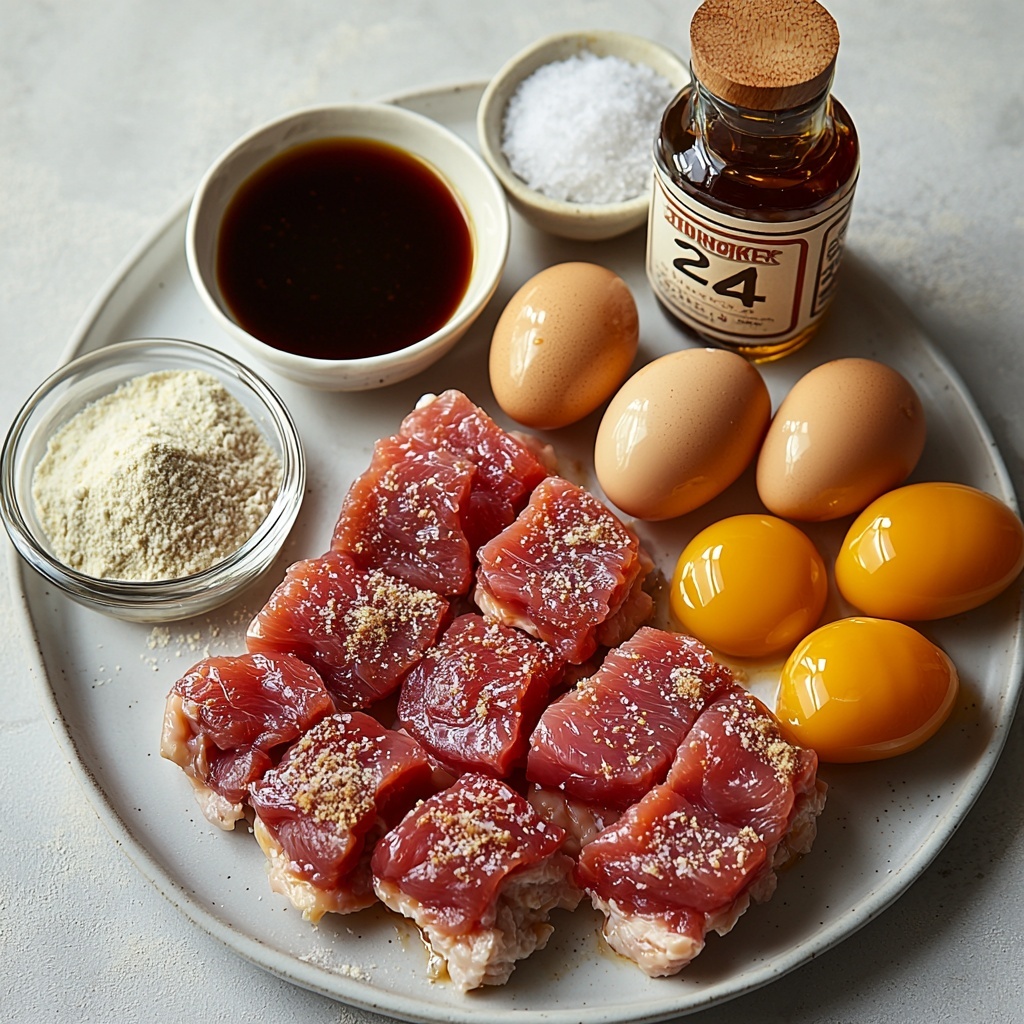
Ingredients You’ll Need
Getting your hands on these simple yet essential ingredients is the first step toward nailing the perfect balance of flavor, crunch, and juiciness. Each component plays a vital role, whether it’s creating that irresistible crisp with panko or keeping the chicken tender and flavorful.
- Chicken Breasts or Thighs: Thighs add extra juiciness, but breasts work beautifully for a leaner option.
- Japanese-Style Panko Breadcrumbs: These create the signature light, crunchy coating for your fried chicken katsu.
- All-Purpose Flour: Provides a dry base so the egg wash adheres perfectly to the chicken.
- Large Eggs (beaten): Acts as the glue that holds the panko in place while adding moisture.
- Salt: Enhances the natural flavors of the chicken and season the coating.
- Black Pepper: Adds a subtle kick and depth to the seasoning.
- Vegetable Oil: Essential for frying; canola oil is a great substitute if preferred.
- Tonkatsu Sauce: This savory, sweet, and tangy sauce is a must-have for serving, either store-bought or homemade.
How to Make Irresistibly Juicy Fried Chicken Katsu with Panko at Home Recipe
Step 1: Prepare the Chicken for Even Cooking
Start by placing your chicken breasts or thighs between two pieces of plastic wrap. Using a meat mallet, gently pound the chicken to an even thickness of about half an inch. This ensures that the chicken cooks uniformly and stays juicy inside while developing a perfectly crispy crust outside.
Step 2: Season the Chicken
Sprinkle both sides of the pounded chicken evenly with salt and black pepper. This simple step layers in flavor right from the start, making sure every bite is well-seasoned before the coating even goes on.
Step 3: Set Up Your Dredging Station
Create three separate plates or shallow bowls: one with all-purpose flour, one with beaten eggs, and one with panko breadcrumbs. This assembly line method keeps everything organized and helps you bread each piece of chicken efficiently for the best coating.
Step 4: Coat the Chicken Thoroughly
Dredge each piece of chicken first in flour, shaking off any excess, then dip it into the beaten eggs, letting the extra drip off. Finally, press it firmly into the panko breadcrumbs to fully coat. The panko’s airy texture will transform into that signature crunchy shell when fried.
Step 5: Fry to Golden Perfection
Pour vegetable oil into a large skillet to about half an inch depth and heat it to 350 degrees Fahrenheit. Carefully lay the coated chicken pieces in the hot oil and fry them for approximately 3 to 4 minutes on each side. Look for a deep golden brown color, which signals that your katsu is perfectly crisp and cooked through.
Step 6: Drain and Rest
Once fried, transfer the chicken to a wire rack or paper towels to drain excess oil. Allow the pieces to rest for about 5 minutes—this little pause helps the juices redistribute, making each bite irresistibly juicy.
Step 7: Slice and Serve
Slice your freshly fried chicken katsu into strips and serve immediately with fluffy steamed rice, crunchy shredded cabbage, and a generous drizzle of tonkatsu sauce for that authentic finish.
How to Serve Irresistibly Juicy Fried Chicken Katsu with Panko at Home Recipe
Garnishes
Adding simple garnishes like finely shredded cabbage or a sprinkle of toasted sesame seeds elevates the presentation and adds delightful texture contrasts. Lemon wedges are fantastic to squeeze over the katsu to brighten up each bite instantly.
Side Dishes
This dish pairs wonderfully with steamed white rice or Japanese short-grain rice for that traditional experience. Miso soup and pickled vegetables complement the crispy chicken beautifully, balancing flavors and adding refreshing notes.
Creative Ways to Present
Take your meal up a notch by serving the katsu in a donburi style bowl—place sliced chicken over rice and drizzle with tonkatsu sauce, adding a soft boiled egg or sliced scallions. Or try it as a sandwich filling between soft buns with cabbage slaw for a tasty twist.
Make Ahead and Storage
Storing Leftovers
Store any leftover fried chicken katsu in an airtight container in the refrigerator for up to 3 days. To keep it from getting soggy, place a paper towel at the bottom of the container to absorb moisture.
Freezing
For longer storage, freeze your cooked chicken katsu pieces in a single layer on a baking sheet, then transfer them to a freezer-safe bag or container. They can last up to 2 months and still maintain great texture once reheated.
Reheating
To enjoy leftovers with that fresh-out-of-the-fryer crunch, reheat in a preheated oven at 375 degrees Fahrenheit for 10 to 15 minutes. Avoid microwaving, which traps moisture and softens the crispy coating.
FAQs
Can I use chicken thighs instead of breasts?
Absolutely! Chicken thighs add more flavor and juiciness and are actually recommended if you want an ultra-tender result in your Irresistibly Juicy Fried Chicken Katsu with Panko at Home Recipe.
Is panko breadcrumb necessary?
Panko breadcrumbs are key because they create a lighter, airier, and crispier crust compared to regular breadcrumbs. Using Japanese-style panko will give you authentic, restaurant-quality crunch.
Can I bake instead of fry the chicken katsu?
You can bake it, but frying gives you that classic golden crispiness. If baking, coat the chicken as usual, place on a greased baking sheet, and spray lightly with oil. Bake at 425 degrees Fahrenheit for about 15-20 minutes, flipping halfway.
What can I use instead of tonkatsu sauce?
If you can’t find tonkatsu sauce, a mixture of Worcestershire sauce, ketchup, soy sauce, and a touch of honey can replicate that sweet-savory profile quite nicely.
How do I make sure the chicken stays juicy inside?
Even thickness when pounding the chicken, proper frying temperature (around 350 degrees Fahrenheit), and resting the chicken for a few minutes after frying are essential to lock in juices for an irresistibly juicy finish.
Final Thoughts
Making this Irresistibly Juicy Fried Chicken Katsu with Panko at Home Recipe is more than just cooking—it’s about crafting a dish that feels special every single time. With straightforward steps and commonplace ingredients, you can bring that crispy, juicy goodness right to your table and impress everyone at home. Do yourself a favor and give it a try; once you taste it, there’s no going back!
Print
Irresistibly Juicy Fried Chicken Katsu with Panko at Home Recipe
- Prep Time: 15 minutes
- Cook Time: 20 minutes
- Total Time: 35 minutes
- Yield: 4 servings
- Category: Main Course
- Method: Frying
- Cuisine: Japanese
Description
This homemade Fried Chicken Katsu recipe features juicy chicken breasts or thighs coated in crispy Japanese-style panko breadcrumbs, perfectly seasoned and pan-fried to golden perfection. Served with tangy tonkatsu sauce, fluffy rice, and shredded cabbage, it’s an irresistible dish that brings authentic Japanese flavors right into your kitchen.
Ingredients
Chicken
- 4 pieces Chicken Breasts or Thighs (Choose thighs for extra juiciness)
- 1 teaspoon Salt (Adjust to taste)
- 1 teaspoon Black Pepper (Adjust to taste)
Breading
- 2 cups Panko Breadcrumbs (Opt for Japanese-style panko for authenticity)
- 1 cup All-Purpose Flour (Gluten-free flour can be used)
- 2 large Eggs (beaten) (Provides moisture and binds the crumbs)
Frying
- 1 cup Vegetable Oil (for frying) (Can use canola oil as substitute)
Serving
- 1 bottle Tonkatsu Sauce (Purchase or make your own)
- Fluffy rice (for serving)
- Shredded cabbage (for serving)
Instructions
- Prepare the Chicken: Place the chicken breasts or thighs between two pieces of plastic wrap. Use a meat mallet to pound the chicken evenly to about ½ inch thickness to ensure even cooking and juiciness.
- Season the Chicken: Sprinkle both sides of the pounded chicken with salt and black pepper to taste, enhancing the flavor before breading.
- Set Up Dredging Station: Arrange separate plates with all-purpose flour, beaten eggs, and panko breadcrumbs to prepare for the breading process.
- Bread the Chicken: Dredge each chicken piece in flour first, shaking off any excess to avoid clumps. Next, dip into the beaten eggs, allowing excess egg to drip off, then press thoroughly into panko breadcrumbs ensuring an even and full coating.
- Heat the Oil: Pour vegetable oil into a large skillet to cover about ½ inch of the bottom. Heat the oil to 350°F (175°C), the ideal temperature for frying chicken to golden crispiness.
- Fry the Chicken: Carefully place the breaded chicken pieces into the hot oil. Fry each side for about 3 to 4 minutes until golden brown and cooked through, reaching an internal temperature of 165°F (74°C).
- Drain Excess Oil: Remove the fried chicken and transfer to a wire rack or paper towels to absorb excess oil, ensuring the coating remains crispy and not greasy.
- Rest and Slice: Let the chicken rest for about 5 minutes to retain juices, then slice into strips for easy serving.
- Serve: Serve the sliced fried chicken katsu immediately with fluffy steamed rice, shredded cabbage, and a generous drizzle of tonkatsu sauce for a complete and authentic meal.
Notes
- Using chicken thighs instead of breasts results in juicier katsu due to higher fat content.
- Pounding the chicken to an even thickness helps it cook evenly without drying out.
- Maintain the oil temperature around 350°F to achieve crispy and non-greasy coating.
- Pressing the chicken firmly into the panko ensures a thick, crunchy crust.
- Letting the fried chicken rest before slicing keeps it juicy and easier to cut.
- Serve immediately for best texture; leftover katsu can lose its crispiness.
- To make this dish gluten-free, use gluten-free flour and gluten-free panko breadcrumbs.

