
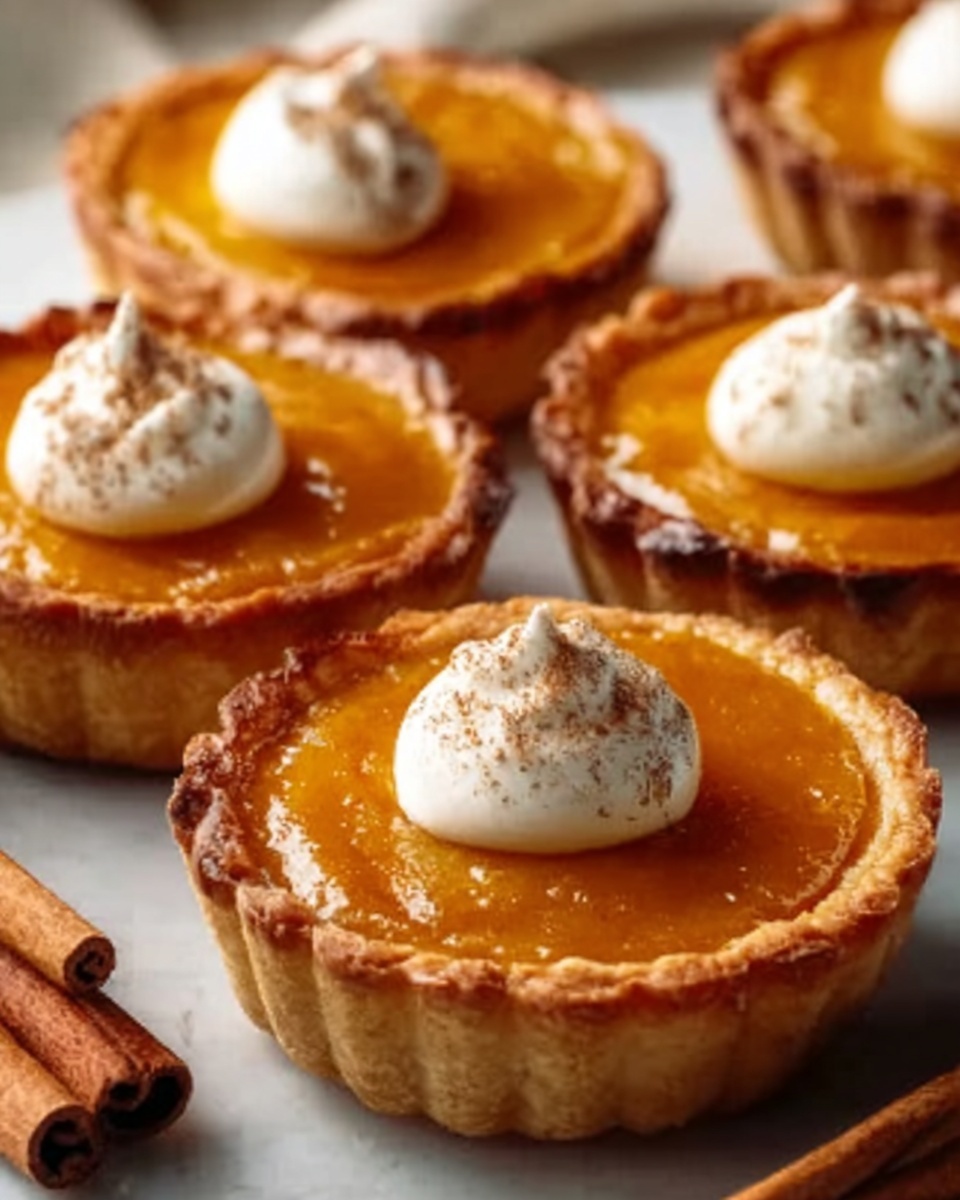
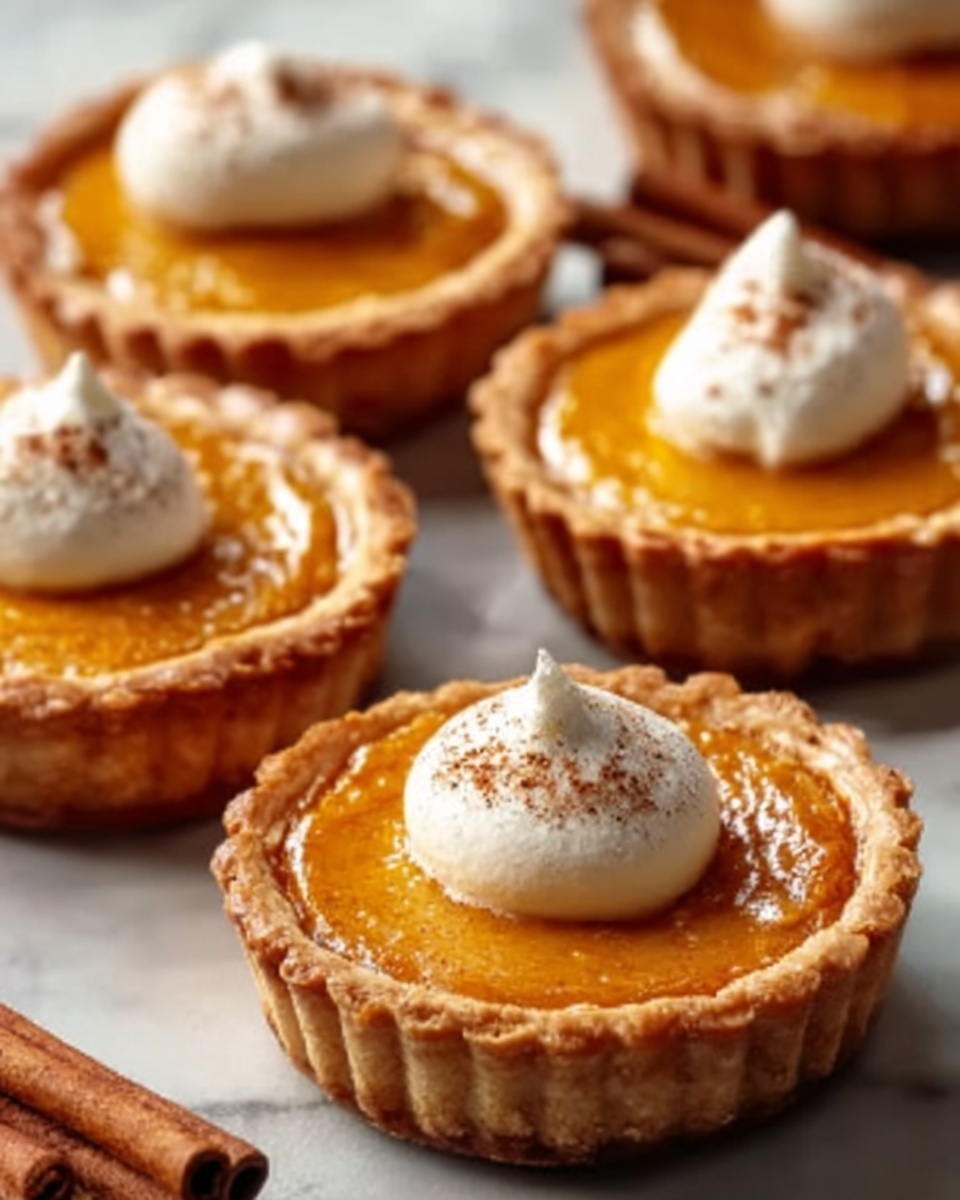
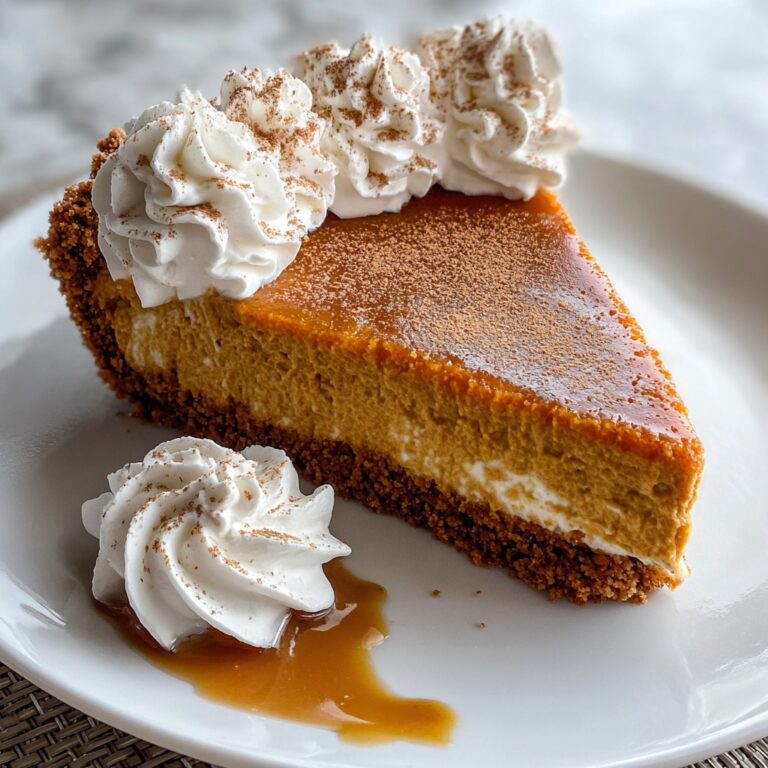
If you love the warm, cozy flavors of fall wrapped up in a cute, bite-sized treat, then you are going to adore this Mini Pumpkin Pies Recipe. These little beauties bring all the classic aromas and tastes of traditional pumpkin pie but in a perfectly portioned size that’s as fun to eat as it is delicious. Imagine tender, flaky crusts cradling a spiced pumpkin filling that’s velvety smooth and fragrantly seasoned—making these mini pies an irresistible treat to share with family and friends at any gathering.
Ingredients You’ll Need
This Mini Pumpkin Pies Recipe uses a handful of simple, pantry-friendly ingredients that come together beautifully to create a rich, flavorful dessert. Each component plays a crucial role: from the flaky pie crusts offering the perfect base, to the pumpkin and warm spices delivering the heart of the flavor, and the vanilla and evaporated milk giving it that creamy, decadent texture.
- Refrigerated pie crusts: Convenient and flaky, perfect for forming those mini pie cups without any fuss.
- Canned pumpkin puree: The star ingredient, providing that authentic pumpkin taste and naturally smooth texture.
- Granulated sugar: Adds just the right amount of sweetness to balance the spices.
- Ground cinnamon, ginger, nutmeg, cloves: A warm, aromatic blend that makes this pie unmistakably fall-flavored.
- Salt: Enhances all the flavors, making sure the spices and pumpkin really shine.
- Large egg: Helps bind the filling together and adds richness.
- Evaporated milk: Creates that creamy, custard-like texture for the filling.
- Vanilla extract: Adds a smooth sweetness that complements the spices perfectly.
- Heavy cream, powdered sugar, cinnamon (for optional whipped cream): For a luscious topping that adds an extra layer of flavor and creaminess.
How to Make Mini Pumpkin Pies Recipe
Step 1: Preheat the Oven and Prepare the Crusts
Start by heating your oven to 350°F (175°C). While it warms up, roll out the refrigerated pie crusts just enough to cut out circles that fit snugly into a muffin tin. Press these circles gently into the muffin cups to form the shells—this step sets the foundation for perfectly shaped mini pies with crispy edges.
Step 2: Mix the Pumpkin Filling
In a medium bowl, whisk together the canned pumpkin puree, granulated sugar, cinnamon, ginger, nutmeg, cloves, salt, egg, evaporated milk, and vanilla extract. Whisking until completely smooth ensures that every bite will be silky and full of warm spices. This mixture is what brings the unmistakable flavor that defines a great pumpkin pie.
Step 3: Fill the Pie Crusts
Carefully spoon the pumpkin filling into each pie crust cup, filling them about three-quarters full. This leaves room for the filling to set as it bakes without spilling over. Precision here means a neat pie ready for the oven and gorgeous to serve.
Step 4: Bake the Mini Pies
Bake the pies on the middle rack for 20 to 25 minutes until the filling is set and the crusts turn golden brown. You’ll know they’re done when a gentle jiggle in the center starts to firm up—this step locks in the texture that makes these petits treats so delightful.
Step 5: Cool and Optional Topping
Once baked, let the mini pies cool completely in the muffin tin before removing. If you want to add a special touch, whip together heavy cream, powdered sugar, and a pinch of cinnamon until soft peaks form. Dollop this spiced whipped cream on top right before serving for a luscious, festive finish.
How to Serve Mini Pumpkin Pies Recipe
Garnishes
A simple dusting of cinnamon or a small sprig of fresh mint can instantly brighten the look of your mini pies. The optional spiced whipped cream topping adds an inviting, creamy texture that pairs perfectly with the smooth pumpkin filling. You can also sprinkle a few toasted pecans or drizzle a bit of caramel sauce for extra indulgence.
Side Dishes
Mini pumpkin pies are the perfect complement to a variety of desserts and drinks. Serve them alongside a cup of hot apple cider or spiced coffee for a cozy fall vibe. They also pair beautifully with fresh fruit platters or a bowl of vanilla ice cream to round out any holiday feast.
Creative Ways to Present
Present these mini pies on a rustic wooden board or a festive platter lined with autumn leaves for a charming seasonal display. You can also arrange them in cupcake liners or wrap them individually in decorative cellophane tied with twine for gift-giving. Their size makes them perfect for party finger foods or elegant dessert buffets.
Make Ahead and Storage
Storing Leftovers
If you find yourself with leftovers, store your mini pumpkin pies in an airtight container in the refrigerator. They stay fresh for up to 3 days and taste just as delightful when chilled, making them an easy grab-and-go dessert option.
Freezing
These mini pies freeze beautifully, allowing you to prep ahead for busy holidays. Place them on a baking sheet to freeze individually before transferring to a freezer-safe container or bag to prevent sticking. They can be stored for up to 2 months without losing their delicious texture or flavor.
Reheating
To enjoy your frozen or refrigerated mini pies warm, simply reheat them in a 325°F oven for about 10 minutes or until heated through. This revives their flaky crust and creamy filling perfectly, making each bite taste just-baked.
FAQs
Can I use fresh pumpkin instead of canned pumpkin puree?
Fresh pumpkin can be used but it requires cooking and pureeing first, and the texture may be less smooth. Canned pumpkin puree is recommended for the best consistency and flavor in this recipe.
What size muffin tin works best for these mini pies?
A standard 12-cup muffin tin is ideal for making 12 perfectly sized mini pumpkin pies. This size offers a great balance for portion control and baking time.
Can I make this recipe vegan?
You can substitute the egg with a flax or chia egg and use a plant-based pie crust and non-dairy milk to make a vegan version. Keep in mind that the texture will be slightly different but still delicious.
Is it necessary to use evaporated milk?
Evaporated milk adds richness and creaminess to the filling, but you can substitute with whole milk or a non-dairy alternative in equal amounts if needed.
How long do the mini pumpkin pies last once baked?
They stay freshest for up to 3 days refrigerated. For longer storage, freezing is your best bet, preserving the quality for up to 2 months.
Final Thoughts
There is something truly magical about sharing a batch of these Mini Pumpkin Pies Recipe with loved ones. They capture the spirit of fall in each bite and offer a delightful way to enjoy pumpkin pie without any fuss. Whether you’re new to baking or a seasoned pro, these mini pies promise big flavor with very little effort. So grab your pie crusts and pumpkin puree and get ready to wow everyone with this simple, scrumptious treat!
Print
Mini Pumpkin Pies Recipe
- Prep Time: 10 minutes
- Cook Time: 25 minutes
- Total Time: 35 minutes
- Yield: 12 mini pies
- Category: Dessert
- Method: Baking
- Cuisine: American
Description
These Mini Pumpkin Pies are perfect bite-sized treats featuring a flaky pie crust filled with a smooth, warmly spiced pumpkin filling. Baked until golden and set, they are great for holiday gatherings or cozy fall desserts. An optional spiced whipped cream topping adds a luscious finishing touch.
Ingredients
For the Pie Crusts
- 1 package refrigerated pie crusts (enough for 12 mini pies)
For the Pumpkin Filling
- 3/4 cup canned pumpkin puree
- 1/3 cup granulated sugar
- 1/2 teaspoon ground cinnamon
- 1/4 teaspoon ground ginger
- 1/4 teaspoon ground nutmeg
- 1/8 teaspoon ground cloves
- 1/4 teaspoon salt
- 1 large egg
- 1/3 cup evaporated milk
- 1 teaspoon vanilla extract
For Spiced Whipped Cream (optional)
- 1 cup heavy cream
- 2 tablespoons powdered sugar
- 1/4 teaspoon cinnamon
Instructions
- Preheat the Oven: Preheat your oven to 350°F (175°C) to prepare for baking the mini pumpkin pies.
- Prepare the Crusts: Roll out the refrigerated pie crusts on a lightly floured surface. Cut out circles that will fit comfortably into the cups of a standard muffin tin. Gently press each pie crust circle into the muffin cups, forming little cups to hold the filling.
- Make the Filling: In a mixing bowl, whisk together the canned pumpkin puree, granulated sugar, ground cinnamon, ground ginger, ground nutmeg, ground cloves, salt, large egg, evaporated milk, and vanilla extract until you achieve a smooth, creamy mixture with all spices well incorporated.
- Fill the Crusts: Pour the prepared pumpkin filling evenly into each pie crust cup, filling them about three-quarters full to allow room for the filling to set as it bakes.
- Bake: Place the muffin tin in the preheated oven and bake the mini pies for 20 to 25 minutes, or until the filling is set in the center and the crusts are golden brown on the edges.
- Cool and Serve: Remove the pies from the oven and allow them to cool completely on a wire rack. For an optional topping, whip together the heavy cream, powdered sugar, and cinnamon until soft peaks form and serve on top of the cooled mini pies for added flavor and texture.
Notes
- Ensure pie crust circles fit snugly but not too tightly in the muffin tin to avoid tearing.
- Use canned pumpkin puree, not pumpkin pie filling, for the best texture and flavor control.
- The spiced whipped cream is optional but adds a creamy, flavorful complement to the pumpkin pies.
- Mini pies can be stored in an airtight container in the refrigerator for up to 3 days.
- For easier removal, let pies cool completely before taking them out of the muffin tin.
