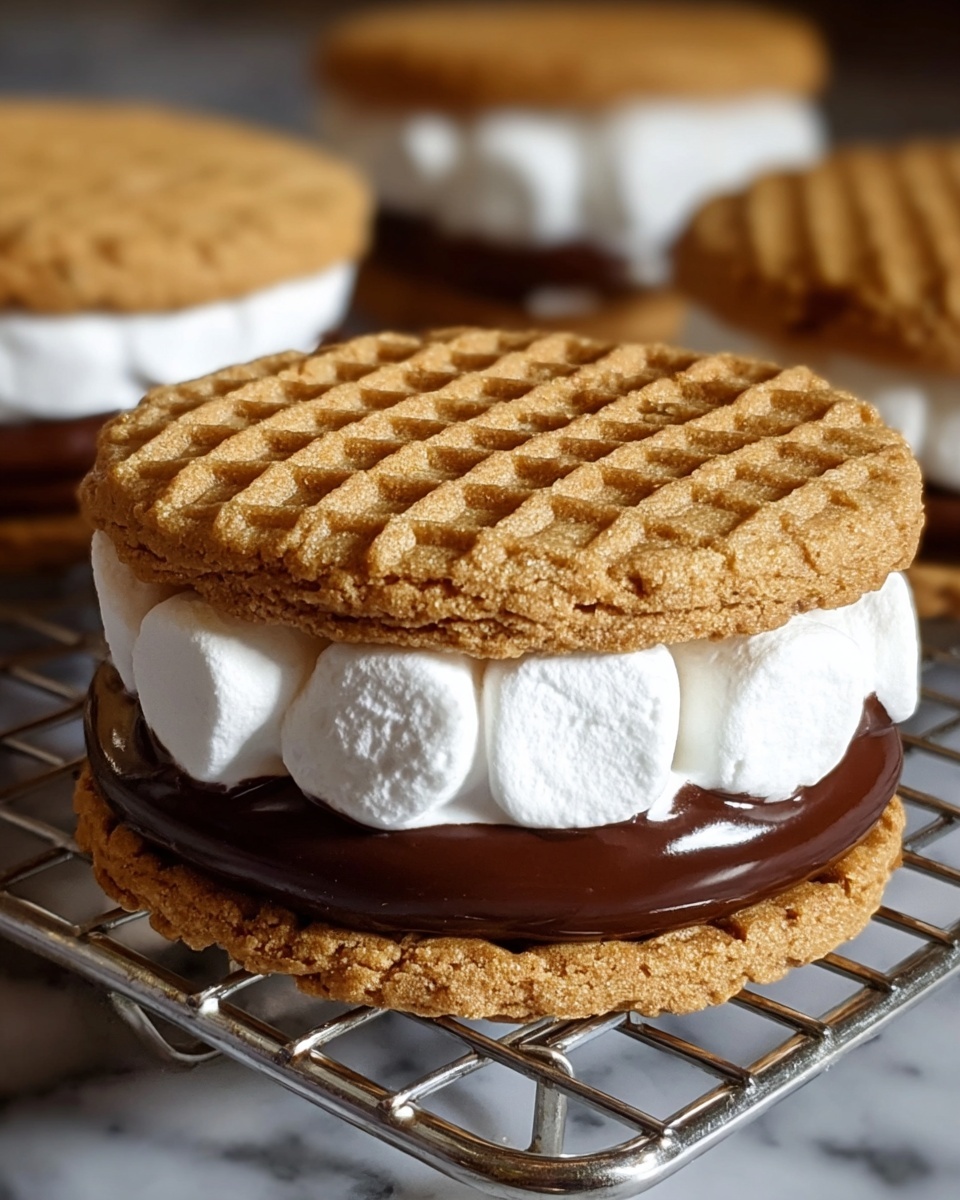
If you’re anything like me and you adore the heavenly combination of chocolate, peanut butter, and gooey marshmallows, then this Peanut Butter S’mores Sandwich Cookies Recipe is going to become your new obsession. These delightful treats capture the nostalgic campfire flavors of classic s’mores but in a playful, handheld cookie form. Soft peanut butter cookies cradle melted chocolate chips and pillowy mini marshmallows, sandwiched together for an irresistible bite every time. You’re going to love how simple ingredients come together to create this unforgettable twist on a beloved favorite.
Ingredients You’ll Need
Gathering these ingredients is a breeze, and each one plays a crucial role in making these cookies the perfect blend of texture and flavor. From the nutty richness of peanut butter to the light sweetness of marshmallows, every bite is balanced beautifully.
- 1 cup all-purpose flour: The sturdy base that gives our cookies structure and a tender crumb.
- 1/2 cup granulated sugar: Adds sweetness and helps achieve a slight crisp around the cookie edges.
- 1/2 cup brown sugar: Brings moisture and a warm, caramel-like depth to the cookie dough.
- 1/2 cup unsalted butter, softened: Contributes to a rich flavor and soft texture.
- 1/2 cup creamy peanut butter: The star ingredient that delivers that unmistakable peanut butter flavor and creamy consistency.
- 1 large egg, room temperature: Binds everything together for a smooth dough.
- 1 tsp vanilla extract: Enhances the overall flavor with sweet aromatic notes.
- 1/2 tsp baking soda: Helps the cookies rise just enough for a tender, soft bite.
- 3/4 cup semi-sweet chocolate chips: For gorgeous pockets of melty chocolate throughout.
- 1 cup mini marshmallows: The gooey, fluffy filling that makes these cookies a true s’mores delight.
How to Make Peanut Butter S’mores Sandwich Cookies Recipe
Step 1: Preheat and Prepare
First things first, crank your oven up to 350°F (175°C). This ensures your cookies have the perfect environment to rise and bake evenly. Line baking sheets with parchment paper or silicone mats to prevent sticking—this prep step will save you time and effort later on.
Step 2: Cream the Butter, Sugars, and Peanut Butter
In a large mixing bowl, beat together the softened butter, granulated sugar, brown sugar, and creamy peanut butter until the mixture looks light and fluffy. This step is key because it aerates the dough, which helps give your cookies a tender crumb and rich flavor that’s simply dreamy.
Step 3: Add Egg and Vanilla
Next, crack in the egg and pour in the vanilla extract. Beat these ingredients together until fully combined, making sure your dough is smooth. The egg acts as a binder, while the vanilla lifts the flavor, making every bite more enticing.
Step 4: Mix Dry Ingredients and Combine
In a separate bowl, whisk together the all-purpose flour and baking soda. Gradually add this dry mix into your wet ingredients, stirring just until you no longer see streaks of flour. Avoid overmixing here to keep your cookies tender rather than tough.
Step 5: Fold in Chocolate Chips
Now for the chocolate magic: gently fold in the semi-sweet chocolate chips. These little gems will melt during baking into luscious pockets of chocolate that balance perfectly with the peanut butter base.
Step 6: Scoop Dough onto Baking Sheets
Use a tablespoon or cookie scoop to drop uniform dollops of dough onto your prepared baking sheets. Be sure to space them nicely apart because they will spread slightly while baking. This helps them bake evenly and gives you beautifully shaped cookies.
Step 7: Bake Until Edges Are Golden
Bake for 10 to 12 minutes, watching for soft centers and golden edges. This timing ensures your cookies are cooked through but still tender and chewy inside—the hallmark of exceptional peanut butter cookies.
Step 8: Add Mini Marshmallows and Finish Baking
Once out of the oven, press several mini marshmallows firmly into the center of each cookie. Pop them back in the oven for an additional 1 to 2 minutes to let the marshmallows puff up and become delightfully gooey. This step really takes the s’mores vibe to the next level.
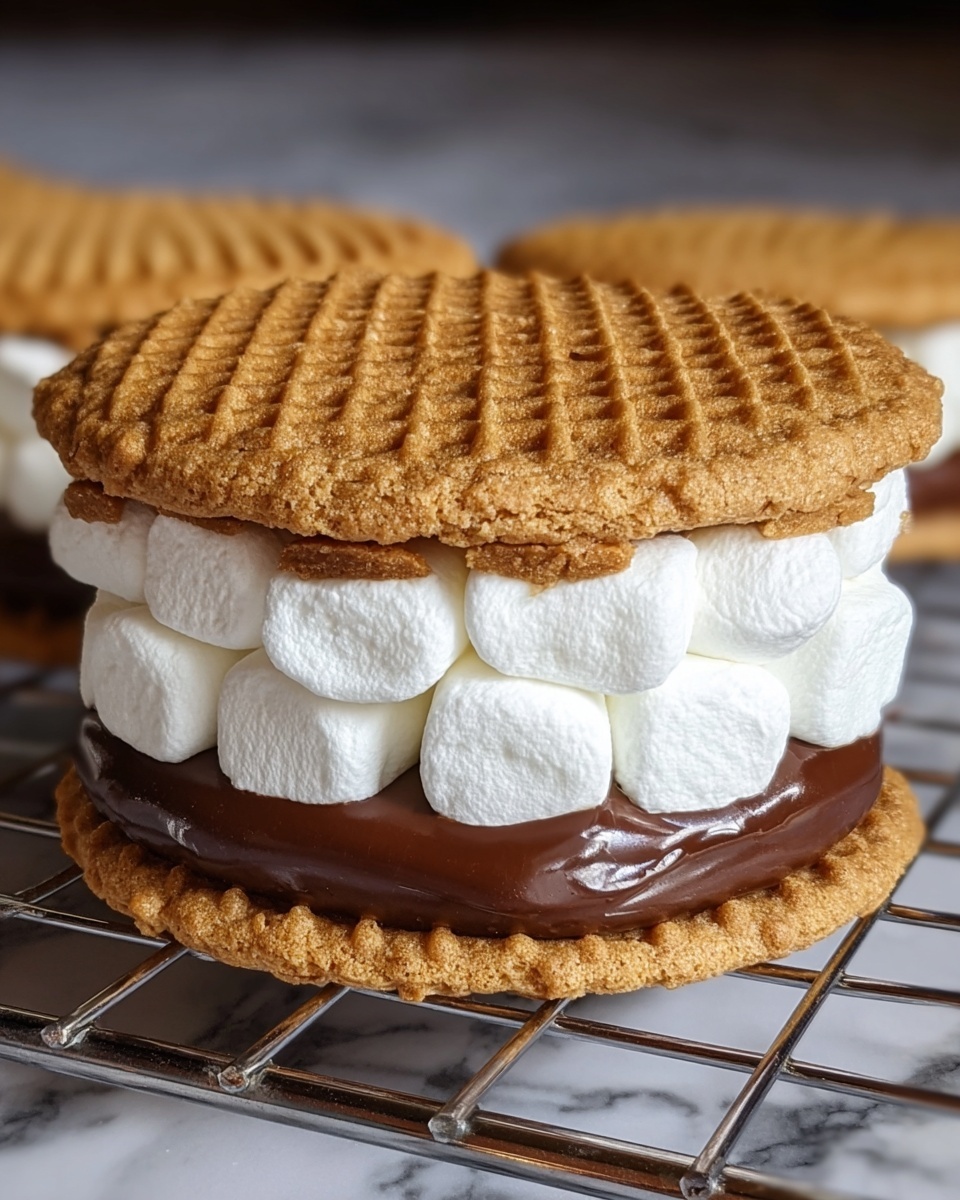
Step 9: Cool Slightly and Sandwich
Allow the cookies to cool for a few minutes until they are firm enough to handle but still warm. Then, sandwich two cookies together with the melted marshmallows nestled in the middle. This is when the magic truly happens; each bite is a nostalgic, melty treat you’ll want to savor.
How to Serve Peanut Butter S’mores Sandwich Cookies Recipe
Garnishes
A sprinkle of crushed graham crackers on top adds a wonderful crunch and visual appeal that echoes classic s’mores. You can also drizzle melted chocolate over the sandwiches for an extra decadent touch that’s sure to impress.
Side Dishes
These sandwich cookies pair beautifully with a cold glass of milk or a steaming cup of coffee or hot chocolate. They’re excellent for dessert or as a cozy snack when you’re craving something sweet and comforting.
Creative Ways to Present
Try serving these cookies on a rustic wooden board with small bowls of extra peanut butter, marshmallows, and chocolate chips for a fun make-your-own s’mores experience. Alternatively, wrap individual sandwiches in wax paper tied with twine for delightful party favors or gifts.
Make Ahead and Storage
Storing Leftovers
Store leftover Peanut Butter S’mores Sandwich Cookies Recipe treats in an airtight container at room temperature for up to 3 days. This keeps them soft and fresh, allowing the marshmallows to remain wonderfully gooey.
Freezing
You can freeze these cookies by placing the sandwiches in a single layer on a baking sheet to freeze solid, then transferring them to a freezer-safe bag. They keep wonderfully for up to 2 months. Just thaw at room temperature when you’re ready to indulge.
Reheating
Warm the cookies gently in the microwave for 10-15 seconds to revive that melty marshmallow and soften the peanut butter for a truly irresistible experience. Be careful not to overheat, or the marshmallows might get too tough.
FAQs
Can I use chunky peanut butter instead of creamy?
Absolutely! Chunky peanut butter will add a delightful crunch to your cookies, giving them a bit more texture. Just expect a slightly different mouthfeel but the flavor will still shine wonderfully.
Are these cookies gluten-free?
Since the recipe calls for all-purpose flour, these cookies are not gluten-free as written. However, you can substitute with a gluten-free all-purpose baking flour blend to make them suitable for gluten-sensitive diets. Just check that your other ingredients are gluten-free.
Can I substitute the chocolate chips for another type of chocolate?
Definitely! Feel free to use white chocolate chips, milk chocolate chunks, or even chopped dark chocolate bars. Each option will add its own twist to the flavor profile while keeping the spirit of the Peanut Butter S’mores Sandwich Cookies Recipe intact.
What can I use instead of mini marshmallows?
If mini marshmallows aren’t available, small pieces of regular marshmallows work just as well. Just chop them into smaller bits for even distribution, or try marshmallow fluff spread between the cookies for an ooey-gooey alternative.
How do I prevent the marshmallows from burning?
To avoid burning, add the marshmallows only during the last 1 to 2 minutes of baking and keep a close eye on them. They should puff up nicely without turning too brown. If your oven tends to run hot, reduce the time slightly.
Final Thoughts
If you’re ready to bring a delightful twist to your cookie game, this Peanut Butter S’mores Sandwich Cookies Recipe is a total winner. It’s easy to make, full of nostalgic flavors, and perfect for sharing with friends and family (or sneaking bites solo, no judgment). Honestly, once you try these, I bet they’ll become your go-to sweet treat for cozy afternoons or special celebrations. So roll up your sleeves and get baking—your taste buds are in for a serious treat!
Print
Peanut Butter S’mores Sandwich Cookies Recipe
- Prep Time: 15 minutes
- Cook Time: 15 minutes
- Total Time: 30 minutes
- Yield: 12 cookies
- Category: Dessert
- Method: Baking
- Cuisine: American
Description
Delight in these Peanut Butter S’mores Sandwich Cookies featuring a soft, peanut buttery cookie base filled with melted chocolate chips and gooey mini marshmallows. Perfectly baked with a warm, chewy texture and a nostalgic s’mores flavor, these cookies are an easy and fun treat to make for gatherings or cozy nights in.
Ingredients
Dry Ingredients
- 1 cup all-purpose flour
- 1/2 tsp baking soda
- 1/2 cup granulated sugar
- 1/2 cup brown sugar
Wet Ingredients
- 1/2 cup unsalted butter, softened
- 1/2 cup creamy peanut butter
- 1 large egg, room temperature
- 1 tsp vanilla extract
Mix-ins and Topping
- 3/4 cup semi-sweet chocolate chips
- 1 cup mini marshmallows
Instructions
- Preheat Oven: Preheat your oven to 350°F (175°C) to prepare for baking the cookies evenly.
- Cream Butter, Sugars, and Peanut Butter: In a mixing bowl, cream together the softened unsalted butter, granulated sugar, brown sugar, and creamy peanut butter until the mixture is light and fluffy, which helps incorporate air for a tender cookie.
- Add Egg and Vanilla: Beat in the large egg and vanilla extract to combine all wet ingredients smoothly, ensuring proper texture.
- Combine Dry Ingredients: Whisk together the all-purpose flour and baking soda separately, then gradually incorporate them into the wet ingredients. Mix gently to avoid overmixing, which can toughen the cookies.
- Fold in Chocolate Chips: Gently fold the semi-sweet chocolate chips into the cookie dough to distribute them evenly without deflating the batter.
- Portion Dough: Using a tablespoon, scoop dollops of dough onto lined baking sheets, making sure to space them sufficiently apart to allow for spreading during baking.
- Initial Bake: Bake the cookies for 10-12 minutes, until the edges start to turn golden while the centers remain soft and chewy.
- Add Marshmallows and Finish Baking: Press mini marshmallows into the center of each cookie and return to the oven for an additional 1-2 minutes until the marshmallows puff up and become slightly melty.
- Cool and Assemble: Allow the cookies to cool slightly on the baking sheets before sandwiching two cookies together to create the s’mores sandwich effect.
Notes
- To prevent marshmallows from burning, watch carefully during the final baking step.
- Use room temperature egg for better incorporation and a smoother batter.
- For a crunchier cookie, bake an additional 1-2 minutes but be cautious not to overbake.
- Store cookies in an airtight container at room temperature for up to 3 days.
- Mini marshmallows can be substituted with regular-sized marshmallows, cut into small pieces if desired.