
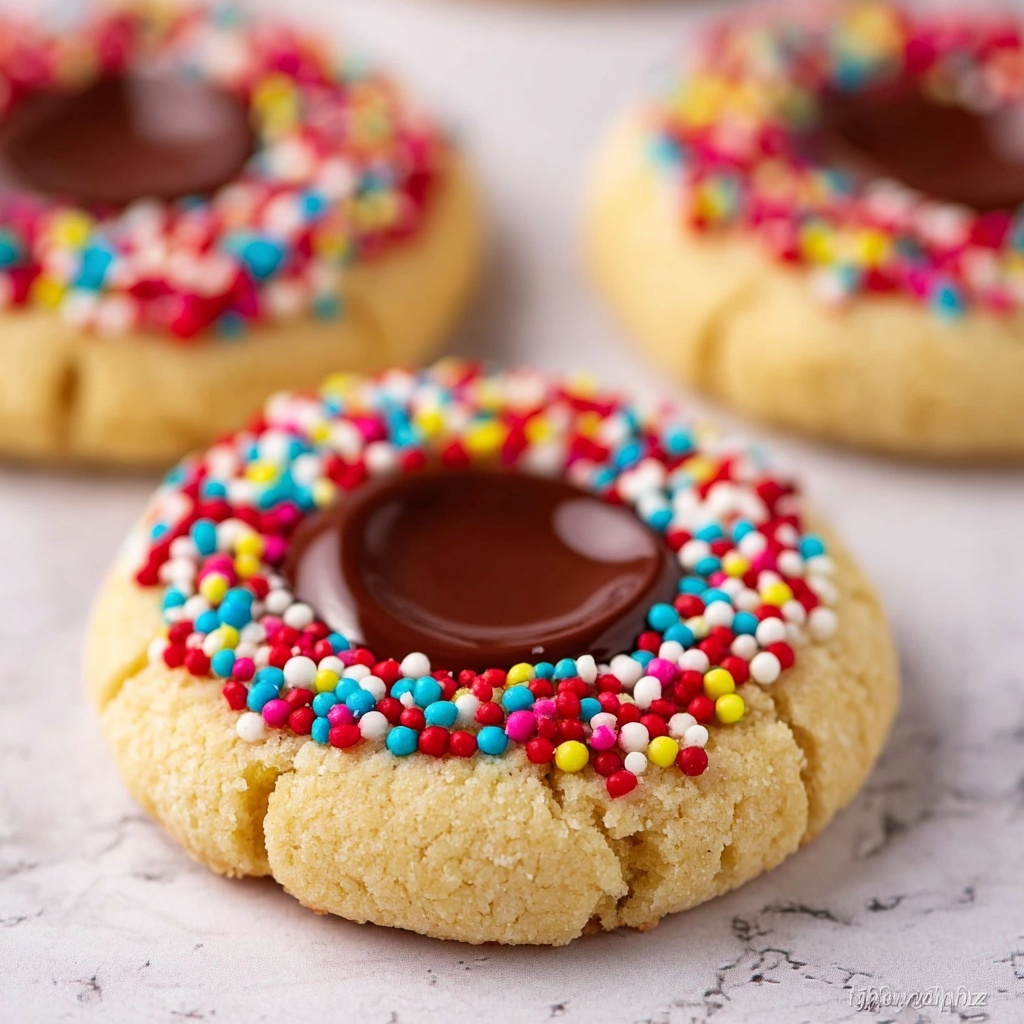
If you’ve been searching for the perfect cookie that pairs buttery, melt-in-your-mouth texture with festive bursts of color and rich chocolate, then this Shortbread Thumbprint Cookies with Chocolate Centers and Sprinkles Recipe is absolutely the treat you need. These charming cookies are surprisingly simple to make, yet irresistibly delightful to eat—soft shortbread with a crisp edge, a decadent chocolate center, and a sprinkle-coated exterior that adds just the right pop of fun. Whether you’re baking for a special occasion or just because, these cookies will quickly become a beloved favorite.
Ingredients You’ll Need
This recipe highlights simple, classic ingredients that work together harmoniously to create a cookie that’s buttery, tender, and perfectly balanced in sweetness. Every component plays an important role, from the rich butter that creates the shortbread’s signature crumb to the sprinkles that add a splash of joyful color.
- Butter (1 1/2 cups, softened): The star of any shortbread, butter delivers that coveted melt-in-your-mouth texture and rich flavor.
- Sugar (1 cup): Sweetens the dough just enough without overpowering the buttery notes.
- Flour (3 ½ cups): Provides structure to the cookie, creating a tender crumb when combined properly with butter.
- Salt (¼ teaspoon): A tiny but essential pinch to enhance all the other flavors.
- Vanilla (1 teaspoon): Brings warmth and depth, rounding out the flavor perfectly.
- Milk Chocolate Almond Bark (4 squares): The luscious filling that melts beautifully into the cookie indentations.
- Heavy Cream (2 – 3 tablespoons): Mixed with chocolate to make an irresistibly smooth, creamy center.
- Sprinkles: These add cheerful color and a slight crunch that makes each bite extra festive.
How to Make Shortbread Thumbprint Cookies with Chocolate Centers and Sprinkles Recipe
Step 1: Cream the Butter and Sugar
Start by combining the softened butter and sugar in a stand mixer bowl. Beat them together until the mixture becomes light, fluffy, and pale in color. This step is crucial because it aerates the mixture which helps make your cookies tender and soft.
Step 2: Add Vanilla
Next, pour in the vanilla extract and mix it thoroughly so the entire batch captures that lovely aroma and subtle sweetness that vanilla brings to baked goods.
Step 3: Mix Flour and Salt
In a separate bowl, blend the flour and salt evenly. Salt may be subtle but it elevates your cookies’ overall flavor dramatically. Incorporating salt right into the flour makes sure it’s well-distributed.
Step 4: Combine Flour Mixture with Butter Mixture
Gradually add the flour and salt mixture to the butter and sugar blend. Mix slowly and carefully, a little at a time, to avoid flour puffing out and to ensure the dough comes together nicely without overworking it.
Step 5: Chill the Dough
Once the dough is formed, pop the mixing bowl into the refrigerator for about 30 minutes. Chilling firms up the dough, making it easier to handle and helps the cookies maintain their shape during baking.
Step 6: Prepare Cookie Sheets
While your dough chills, line two cookie sheets with parchment paper to prevent sticking and make cleanup a breeze.
Step 7: Shape and Coat the Dough Balls
Take the dough out and scoop tablespoon-sized portions, rolling each in a shallow dish of sprinkles. This not only adds color but a fun crunch to the outer edges. Place these sprinkle-covered dough balls onto the prepared cookie sheets.
Step 8: Make the Thumbprints
Use your thumb or knuckle to press a gentle but defined indentation in the center of each dough ball. This is the cozy little “nest” that will hold the luscious chocolate filling later on.
Step 9: Bake the Cookies
Bake the cookies in a 350-degree oven for 18 to 22 minutes until golden brown around the edges. The aroma while they bake will be irresistible. After baking, transfer cookies to a wire rack to cool completely—this prevents sogginess and preserves that perfect shortbread texture.
Step 10: Melt Chocolate Filling
In a microwave-safe bowl, combine the milk chocolate almond bark and heavy cream. Heat the mixture in 10-second bursts, stirring frequently until smooth and glossy. If it feels too thick, add a drop or two more cream to reach that perfect pourable consistency.
Step 11: Fill the Cookie Centers
Carefully spoon or pour the melted chocolate into the thumbprint indentations of each cookie, filling them generously but not overflowing. This silky chocolate center is what elevates these cookies from ordinary shortbread to an indulgent treat.
Step 12: Add More Sprinkles
While the chocolate is still warm and soft, sprinkle a few more colorful sprinkles on top for an eye-catching finish that says celebration!
Step 13: Let the Cookies Set
Allow the cookies to rest for at least one hour at room temperature or pop them in the refrigerator to speed things up. Just be sure to bring them back to room temperature about 30 minutes before serving, so the chocolate centers aren’t too hard.
How to Serve Shortbread Thumbprint Cookies with Chocolate Centers and Sprinkles Recipe

Garnishes
These cookies shine simply with their own sprinkles, but you can add an extra touch by dusting a light sprinkle of powdered sugar or even a hint of edible glitter on top to glam them up for parties or gift-giving.
Side Dishes
Serve these delightful treats alongside a warm cup of tea, rich hot chocolate, or a creamy latte to complement the buttery, chocolaty flavors perfectly. They also pair beautifully with fresh berries or a scoop of vanilla ice cream for a dessert platter that wows.
Creative Ways to Present
Arrange your Shortbread Thumbprint Cookies with Chocolate Centers and Sprinkles Recipe on a decorative platter or tiered cookie stand for an inviting display. Wrap a few in clear cellophane tied with a festive ribbon as homemade gifts that will brighten anyone’s day.
Make Ahead and Storage
Storing Leftovers
Store any leftover cookies in an airtight container at room temperature for up to a week. Storing them properly keeps both the shortbread texture and chocolate centers deliciously fresh.
Freezing
You can freeze the baked cookies without the chocolate filling for up to three months. When ready to serve, thaw completely and add the melted chocolate and sprinkles just before serving for best texture and taste.
Reheating
If your cookies lose some softness, gently warm them in a low oven (about 250 degrees) for a few minutes to revive that fresh-baked texture. Avoid microwaving as this can melt the chocolate too much and change the cookie’s integrity.
FAQs
Can I substitute unsalted butter for salted butter?
Absolutely! Using unsalted butter allows you to control the salt content precisely, which is why the recipe calls for added salt to balance flavors. Just make sure to stick with the amount suggested for the best results.
What if I don’t have Almond Bark for melting?
You can substitute with good-quality milk chocolate chips or bars. Just melt them with the heavy cream as directed. Almond Bark is convenient because it melts smoothly and keeps its shape well, but good-quality chocolate will work wonderfully.
Can I use other types of sprinkles?
Definitely! Use whatever sprinkles you love—be it classic rainbow, holiday-themed, or even edible glitter. They add fun texture and color, and there’s no wrong choice here.
How do I make sure the thumbprints don’t spread too much when baking?
Chilling the dough before baking is key to controlling spread. Make sure your dough is chilled for at least 30 minutes and don’t press the indentations too flat to help them maintain a nice shape.
Can these cookies be made gluten-free?
Yes! Substitute the all-purpose flour with a gluten-free flour blend that’s suitable for baking. You might need to adjust slightly for texture, but many gluten-free flours work well in shortbread recipes.
Final Thoughts
There’s something truly magical about biting into a Shortbread Thumbprint Cookies with Chocolate Centers and Sprinkles Recipe treat—each bite feels like a small celebration. Whether for holidays, gifts, or your next cozy baking day, these cookies combine nostalgia and joy seamlessly. Give this recipe a try; I promise it will become one of your favorites to bake and share!
Print
Shortbread Thumbprint Cookies with Chocolate Centers and Sprinkles Recipe
- Prep Time: 10 minutes
- Cook Time: 22 minutes
- Total Time: 1 hour 32 minutes
- Yield: 32 cookies
- Category: Dessert
- Method: Baking
- Cuisine: American
Description
Delightfully buttery and tender Shortbread Thumbprint Cookies topped with creamy milk chocolate and crunchy sprinkles. These classic cookies feature a rich shortbread base with a smooth chocolate center, making them perfect for festive occasions or everyday treats.
Ingredients
Dough Ingredients
- 1 1/2 cups butter, softened
- 1 cup sugar
- 3 ½ cups all-purpose flour
- ¼ teaspoon salt
- 1 teaspoon vanilla extract
Chocolate Filling
- 4 squares Milk Chocolate Almond Bark
- 2 – 3 tablespoons heavy cream (plus a few drops more if needed)
Toppings
- Sprinkles
Instructions
- Mix Butter and Sugar: Combine the softened butter and sugar in the mixing bowl of a stand mixer and beat until the mixture becomes light and fluffy, ensuring a smooth start to your cookie dough.
- Add Vanilla: Incorporate the vanilla extract and mix thoroughly to infuse the dough with a sweet aromatic flavor.
- Prepare Flour Mixture: In a separate bowl, add salt to the flour and blend well to evenly distribute the salt for consistent seasoning.
- Combine Dry and Wet Ingredients: Gradually add the flour and salt mixture into the butter and sugar mixture, a little at a time, mixing well between each addition until the dough forms.
- Chill Dough: Transfer the dough bowl to the refrigerator and chill for 30 minutes; this firms up the dough making it easier to handle.
- Prepare Baking Sheets: Once chilled, line two cookie sheets with parchment paper to prevent sticking and for easy cleanup.
- Shape and Coat Cookies: Roll the dough into tablespoon-sized balls, then roll each ball in the sprinkles to coat the exterior, adding festive color and crunch.
- Create Indentations: Place the sprinkle-coated balls on the cookie sheets, then press your thumb or knuckle into the center of each ball to create a well for the chocolate filling.
- Bake Cookies: Bake in a preheated oven at 350°F (175°C) for 18 to 22 minutes or until the cookies turn golden brown around the edges.
- Cool Cookies: Remove cookies from oven and transfer to a wire rack to cool completely, preparing them for the chocolate filling step.
- Melt Chocolate: In a microwave-safe bowl, combine the milk chocolate almond bark and heavy cream; microwave on high in 10-second intervals, stirring between, until the chocolate is melted and smooth. Add a few drops more cream if mixture is too thick.
- Fill Cookies: Spoon or pour the melted chocolate into the indentations in the center of each cooled cookie to fill the thumbprint cavities.
- Add Final Sprinkles: While the chocolate is still warm and soft, sprinkle extra sprinkles on top for decoration and extra texture.
- Set Chocolate: Let the cookies sit for at least one hour at room temperature to allow the chocolate to set firmly.
- Optional Chilling: To speed up the setting process, place the cookies in the refrigerator but remember to bring them back to room temperature for at least 30 minutes before serving to ensure the best texture and flavor.
Notes
- Using softened butter is crucial for achieving the right dough consistency.
- Chilling the dough helps maintain the cookie shape during baking.
- Microwave chocolate in short bursts to prevent burning.
- Add a few drops of cream if the melted chocolate mixture becomes too thick.
- Allow cookies to come to room temperature after refrigeration for the best taste and texture.
- These cookies can be stored in an airtight container for up to 5 days.


